December 30, 2007
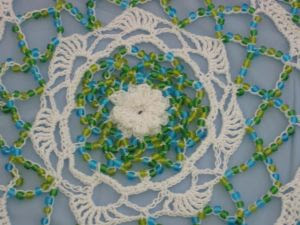
Beaded Oval Dolie Free Crochet Pattern
MATERIALS:
Size 10 crochet thread in White, size 7 hook, 3 bottles of 28 grams ea size E seed beads in a blue & green mix and large eye beading needle.
FINISHED DOILIE: 7-1\4” X 13-1\2”
DOLIE:
With large eye beading needle thread on 162 beads onto white thread, remove beading needle.
With 7 hook and thread, ch-3, sl st to form a ring.
RND 1: Ch-1, 8 sc in ring, sl st top beg sc, ch-1, turn. (8 sts)
RND 2: * Sl st in front lp next st, ch-3, work 3 trc cl in sa st, sl st sa st, * rep bet ** 8 times, do not turn.
RND 3: * Sl st in back lp next st left after working rnd 2, ch-3, work 3 trc cl in sa st, sl st sa st, * rep bet ** 8 times, do not turn.
RND 4: Ch-3, sl st top trc cl next back petal, * (slide bead, ch-1) 3 times, sl st top next trc cl, 8 rep bet ** 9 times, do not turn.
RND 5: Ch-1, * (slide bead, ch-1) 4 times, sl st next lp, * rep bet ** 9 times.
RND 6: Ch-1, * (slide bead, ch-1) 5 times, sl st next lp, * rep bet ** 9 times.
RND 7: Ch-1, * (slide bead, ch-1) 6 times, sl st next lp, * rep bet ** 9 times.
RND 8: (Ch-7, sl st next lp) 9 times, ch-7, sl st base beg lp, ch-1, turn. (10 lps)
RND 9: sl st into 1st lp, ch-1, work 10 sc in ea lp around, sl st top beg sc, ch-1, turn. (100 sts)
RND 10: Sc 1st st, (ch-6, sk 6 sts, sc next st) 13 times, ch-6, sk 8 sts, sl st top beg sc, ch-1, turn.
RND 11: Sl st next lp, ch-1, sc sa lp as beg ch-1, * ch-3, (trc, ch-1) 7 times next lp, trc sa lp, ch-3, sc next lp, * rep bet ** 6 times, ch-3, (trc, ch-1) 7 times next lp, trc sa lp, ch-3, sl st top beg sc, fasten off.
With large eye beading needle thread on 266 beads, remove needle.
RND 12: Join end rnd 11, ch-1, turn, * (slide bead, ch-1) 9 times, sl st ch-1 sp bet 4th and 5th trc previous row, rep bet () 9 times, sl st top next sc, * rep bet ** around ending with sl st top 1st sl st do not turn. (14 lps)
RND 13: * (slide bead, ch-1) 10 times, sl st next lp, * rep bet ** 14 times, do not turn.
RND 14: (Ch-11, sl st next lp) 14 times, ch-11, sl st bottom 1st sl st made, ch-1, turn. (15 lps)
RND 15: Sl st next lp, ch-1, work 11 hdc in ea lp around, sl st top beg hdc, ch-1, turn. (165 sts)
RND 17: (2 hdc next st, hdc next 14 sts) around, sl st top beg hdc, fasten off.
With large eye beading needle thread 390 beads onto white and remove beading needle.
ROW 18: Join end rnd 17, ch-1, *(slide bead, ch-1) 5 times, sk 4 sts, sl st next st, * rep bet ** 12 times, leave remaining sts unworked, turn. (12 lps)
ROW 19-29: Ch-2, sl st 1st lp, * (slide bead, ch-1) 5 times, sl st next lp, * rep bet ** across, turn. End row 29 fasten off. (11 lps)(10 lps)(9 lps)(8 lps)(7 lps)(6 lps)(5 lps)(4 lps)(3 lps)(2 lps) (1 lp)
With large eye beading needle thread 390 beads onto white and remove beading needle.
ROW 30: Count over 27 sts from end st row 18, join next st, ch-1, *(slide bead, ch-1) 5 times, sk 4 sts, sl st next st, * rep bet ** 12 times, leave remaining sts unworked, turn. (12 lps)
ROW 31-40: Ch-2, sl st 1st lp, * (slide bead, ch-1) 5 times, sl st next lp, * rep bet ** across, turn. End row 40 fasten off. (11 lps)(10 lps)(9 lps)(8 lps)(7 lps)(6 lps)(5 lps)(4 lps)(3 lps)(2 lps) (1 lp)
ROW 41: Join sa st as 1st st row 30, (ch-4, sl st next lp), rep bet () in ea beaded lp and side of lp, fasten off. (23 lps)
ROW 42: Join sa st as 1st st row 18, (ch-4, sl st next lp), rep bet () in ea beaded lp and side of lp, do not fasten off. (23 lps)
RND 43: Ch-1, turn, work 5 hdc in ea lp and hdc in ea st around outer edge of do lie, sl st top beg hdc, fasten off.
http://www.donnascrochetdesigns.com/
http://www.freepatternsdonnascrochetdesigns.com/
Free Crochet Pattern Jewelry Pin Holder
Small amounts of TLC Amore yarn in White and Grape, H hook or hook to obtain gauge, 5” X 7” decorative frame, small amount of stuffing, stapler, cardboard, needle and thread
GAUGE: 4 sc\dc sts = 1”, 5 rows pattern = 1”
BACK:
ROW 1: With H hook and Grape yarn ch-25, sc 2nd ch from hook, (dc next ch, sc next ch) across ending with dc last ch, ch-1, turn. (24 sts)
ROW 2-24: (Sc next dc, dc next sc) across, ch-1, turn. At the end of row 24 fasten off.
DECORTIVE CENTER:
RND 1: With H hook and white yarn, * ch-18, trc 10th ch from hook *, rep bet ** once more, sl st 1st ch beg ch-18, do not turn.
RND 2: Sl st to ch-8 lp, ch-1, work 8 sc, [* ch-4, sl st 1st ch for picot *, rep bet ** total 3 times, sl st in last sc made to form picot cluster], sc sa lp, work 6 sc next lp, rep bet [], work 6 sc sa lp, work 8 sc next lp, rep bet [], work 8 sc sa lp, work 6 sc next lp, rep bet [], work 6 sc sa lp, sl st top beg sc, fasten off.
With needle and thread, sew to center of back.
ROSE:
ROW 1: With H hook and white yarn ch-32, sc 6th ch from hook, (ch-3, sk next ch, sc next ch) across, ch-1, turn. (14 lps made)
ROW 2: (Sc, hdc, 3 dc, hdc, sc) 1st lp, )sc, hdc, 4 dc, hdc, sc) in ea next 3 lps, (sc, hdc, 5 dc, hdc, sc) in ea of next 4 lps, (sc, hdc, 6 dc, hdc, sc) in ea of next 3 lps, (sc, hdc, 7 dc, hdc, sc) in ea of last 3 lps, fasten off.
Beg with 1st petal beg rolling until rose is formed, tack with needle and thread. Either sew or glue rose to center circle on decorative center just made.
Remove glass from frame, cut a piece of cardboard that fits inside the frame, double-checking to make certain it fits. Carefully staple 3 of the edges of the crochet piece to the very edge of the cardboard, easing in the fullness. Stuff this piece checking several times to make sure you have inserted enough stuffing. Staple the last edge to cardboard. Insert piece into frame as you would for a picture.
Badge Holder Free Crochet Pattern
Materials:
Any Caron Jewel Box yarn (in my examples I used Deep Jasper, Emerald and Amethyst, G hook or hook to obtain gauge pliers and an alligator clip (found in hardware stores or in Jewelry\bead section of most craft stores.)
GAUGE: 2 hdc = 3\4", 3 rows hdc = 1"
HOLDER:
ROW 1: With yarn and G hook ch-3, hdc 2nd ch from hook, hdc next ch, ch-1, turn. (2 sts)
ROW 2: Hdc ea st across, ch-1, turn.
Rep row 2 until piece will fit easily over your head, do not fasten off.
Place ends of piece tog and working through both thickness, hdc ea st across, ch-1, turn. (2 sts)
Rep row 2, twice.
Next row: hdc dec 2 sts tog as 1, ch-1, turn.
Next row: hdc only st, fasten off.
Place the single st in the end of the clip, with pliers, press ea side of the clip down to cover st.
Pink Cluster Necklace Free Crochet Pattern
Materials:
Size 10 crochet thread in light pink, size 7 crochet hook, needle to take thread, about 600 size E pink seed beads, necklace clasp and large eye beading needle.
Beaded Rounds:
With large eye beading needle thread 20 beads onto crochet thread, remove beading needle, with 7 hook ch-4, sl st to form a ring.
RND 1: Ch-1, work (slide bead, sc) 8 times in ring, sl st top beg sc, ch-1, turn. (8 sts)
RND 2: (2 sc next st, sc next st) around, sl st top beg sc, ch-1, turn. (12 sts)
RND 3: (Slide bead, sc next st) 12 times, sl st top beg sc, ch-1, turn.
RND 4: (2 sc next st, sc next 2 sts) around, sl st top beg sc, fasten off. (16 sts) make 28.
Thread needle with Crochet thread and sew tog along back, sew on clasp.
Crochet Tassels Free Pattern
Materials:
Baby wt yarn in any color or colors you like, 1-1\2" wooden candle cup, various size wooded beads and wheels, paint, small rubber band, size E hook and needle to take yarn.
STRIP:
ROW 1: With E hook and yarn ch-2, sc 2nd ch from hook, ch-1, turn.(1 st)
ROW 2-4: Sc st, ch-1, turn.
ROW 5: 2 sc next st, ch-1, turn. (2 sts)
ROW 6: Sc ea st across, ch-1, turn.
ROW 7: 2 sc next 2 sts, ch-1, turn. (4 sts)
ROW 8-27: Rep row 6.
ROW 28: (Work next 2 sts tog as 1 in sc dec) twice, ch-1, turn. (2 sts)
ROW 29: Rep row 6.
ROW 30: Sc dec next 2 sts, ch-1, turn. (1 st)
ROW 31-33: Rep row 6. At the end of row 33 fasten off.
Make 28 of these for a solid color tassel.
Make 11 white and 17 teal strips for a two-color tassel.
Make 6 green, 6 lavender, 6 blue and 10 in playtime print for the multi color tassel.
FINISHING:
Gather your strips tog in a bundle and secure with a small rubber band.
Paint the candle cup and wooded beads in a color or colors you like.
Thread a needle with a length of yarn. Fold in half and thread through the bead and cup’s holes.
Knot yarn to hold. Glue beads and cup tog. Place a thin layer of glue along the inside of the candle cup. Carefully insert banded tog strips into the cup, twisting to make sure the bundle goes in fully. Let dry and you have a lovely, chunky tassel.
http://www.donnascrochetdesigns.com/
http://www.freepatternsdonnascrochetdesigns.com/
JOY Free Crochet Pattern
MATERIALS:
Size 10 crochet thread in Green and White of Red and White, size 7 crochet hook or hook needed to obtain gauge, 4 chenille stems for ea JOY, 1\4” wide ribbon for hanger (optional), invisible (clear) sewing thread and sewing needle.
FINISHED SIZE: 4” wide X 3-1\4” (Y) tall.
Gauge: 3 hdc sts = 1\2”, 3 rows hdc = 1\2”
BASIC INSTRUCTIONS:
Work drop thread behind sts as you work.
With Green (or Red) and 7 hook ch-3, sl st to form a ring.
RND 1: Ch-1, work 3 hdc in ring, drop Green, join White, hdc twice in ring, pick up Green, drop White, hdc 3 time in ring, drop Green, pick up White, hdc in ring, do not turn.
CONTINUING: Hdc White in top of next st (should be a Green st),* drop White, pick up Green, hdc next 3 sts, drop Green, pick up White, hdc next 2 sts, * rep bet ** until piece is as long as you need (see instructions for ea letter) Then fasten off White, pick up Green hdc next 2 sts, sl st next st, fasten off Green.
J:
J is worked in two sections. Make one crochet pieces 3-1\4” long then fasten off. Make second piece 2” long and fasten off.
Cut a 6-1\2” length of chenille stem and a 4” length. Fold in half and twist to hold. Insert ea stem in appropriate crochet piece. With needle and thread sew ea open end closed. Sew 3-1\4” piece in the center of the 2” piece and then bend into a J.
O:
Make a 5” crochet piece and fasten off. Cut a 10” length of Chenille stem. Fold in half and twist to hold. Insert stem into the 5” crochet piece. Bend into an O shape and sew ends tog. Sew O to J at the top 2” and center of 3-1\4”.
Y:
Y is worked in two sections. Make one crochet pieces 3” long then fasten off. Make second piece 1-1\4” long and fasten off.
Cut a 6” length of chenille stem and a 2-1\2” length. Fold in half and twist to hold. Insert ea stem in appropriate crochet piece. With needle and thread sew ea open end closed. Sew 1-1\4” piece at about 1-1\4” down on longer piece and then bend into a Y. Sew Y to O at sides.
To make it into an ornament cut a 6” length of 1\4” wide ribbon. Loop ribbon around O and knot ends.
JOY can be used as an ornament for your Christmas tree, something extra on a package or scrape booking page or even as a pin.
http://www.donnascrochetdesigns.com/
http://www.freepatternsdonnascrochetdesigns.com/
December 06, 2007
Free Crochet Pattern Wedding Heart Appliques
MATERIALS:
Size 10 Crochet Thread in White, size 4 mm white pearl beads, large eye beading needle, needle to take crochet thread and size 7 crochet hook.
FINISHED SIZES: Large heart: 3” across widest pt, 2” from pt. Small heart: 1-3\4” across widest pt, 1-1\2” from pt. Bow: 1” X 2”.
LARGE HEART:
Thread on 37 beads using large eye beading needle, remove needle.
ROW 1: With thread and 7 hook ch-25, sl st 7th ch from hook, (ch-4, sk 2 ch, sl st next ch) 6 times turn. (7 lps)
ROW 2-7: Ch-2, sl st in 1st lp, (ch-4, sl st next lp) across, turn. (6 lps)(5 lps)(4 lps)(3 lps)(2 lps)(1 lp)
RND 8: Ch-1, work (sc, hdc, dc, trc, ch-2, trc, dc, hdc, sc) in next lp, evenly sc along side of heart to foundation ch, hdc 1st ch, 3 dc next ch, 3 trc next 2 ch, 3 dc next ch, hdc next ch, sc next ch, sl st next 2 ch, sc next ch, hdc next ch, 3 dc next ch, 3 trc next 2 ch, 3 dc next ch, hdc next ch, sc next ch, sl st in side of heart, evenly sc across to beg sc, sl st top beg sc, ch-1, turn.
RND 9: (Sc next st, slide bead, sc next st) around sl st in previous sl st and working (Sc, ch-2, sc) in ch-2 sp, sl st top beg sc, fasten off.
SMALL HEART:
Thread on 10 beads using large eye beading needle, remove needle.
ROW 1: With thread and 7 hook ch-16, sl st 7th ch from hook, (ch-4, sk 2 ch, slide bead, sl st next ch) 6 times turn. (4 lps)
ROW 2-4: Ch-2, sl st in 1st lp, (ch-4, slide bead, sl st next lp) across, turn. (3 lps)(2 lps)(1 lp)
RND 5: Ch-1, work (sc, hdc, dc, trc, ch-2, trc, dc, hdc, sc) in next c lp, evenly work sc across side, hdc 1st ch of row 1 foundation ch, 3 dc next 2 ch, sl st next 4 ch, 3 dc next 2 ch, hdc next ch, evenly sc across side to beg sc, sl st top beg sc, ch-1, turn.
RND 6: Sc ea st around working sl st in previous sl st and (sc, ch-2, sc) in ch-2 sp, sl st top beg sc, fasten off.
BOW:
ROW 1: With thread and 7 hook ch-9, sc 2nd ch from hook, (dc next ch, sc next ch) across to last ch, dc last ch, ch-1, turn. (8 sts)
ROW 2-26: (Sc next st, dc next st) across, ch-1, turn. End row 26 fasten off.
With needle and thread sew short ends tog to form a lp. Fold flat so that seam is in the center.
BOW CENTER:
ROW 1: With thread and 7 hook, ch-2, sc 2nd ch from hook, ch-1, turn. (1 st)
ROW 2-6: Sc only st, ch-1, turn. End row 6 fasten off.
Sew center around bow gathering it as you sew.
I think this is a very verstile combination: Large Heart, Small Heart and Bow. You can use them in any combination along the hem of a dress, the bodic or even as an accent for the ring pillow.
http://www.donnascrochetdesigns.com/
http://www.freepatternsdonnascrochetdesigns.com/
Free Crochet Pattern Suede Yarn 2 piece Belt Interwoven
Two-Piece Interwoven Belt
MATERIALS:
2 skeins Lion Suede yarn in Ecru, H hooks or hook to obtain gauge, 2 D rings, needle and thread.
GAUGE: 3 hdc = 1”, 2 rows hdc = 1”
FINISHED SIZE: 2-3\4” X 46”
BELT:
RND 1: With Ecru and H hook ch-16, sl st to form a ring, ch-1, (Hdc next ch, 2 hdc next ch) around, sl st top beg hdc, ch-1, turn. (24 sts)
ROW 2: Hdc next 6 sts, leave remaining sts unworked, ch-1, turn. (6 sts)
ROW 3-6: Hdc ea st across, ch-1, turn.
RND 7: Ch-12, sl st to side st of row 6 to form a lp, ch-1, (hdc next ch, 2 hdc next ch) across ch, sl st in side of last st in row 6, ch-1, turn. (18 sts in chs)
ROW 8: Sl st next 6 sts, ch-1, hdc next 6 sts, leave remaining sts unworked, ch-1, turn.
ROW 9-12: Hdc ea st across, ch-1, turn.
Rep rnd 7 and row 8-12 10 more times.
Rep rnd 7.
Next row, sl st next 8 sts, ch-1, hdc next 2 sts, ch-1, turn.
Hdc ea st across for 11 more rows and fasten off.
Rep entire instructions again for the second one only Hdc ea st across for 5 more rows and fasten off.
PUTTING IT TOGETHER:
Lay one section flat onto a table, doesn’t matter which one. The first ring made (rnd 1) is the top of the piece with the end with rows of 2 hdc as the bottom. Beg with the top of the piece (one on the table) and weave over and under the circular openings with the second piece beg with its bottom, to the end. Sew the 2 D rings to the shorter bottom end and use the longer to fasten the belt with.
This is another belt that is easy to make longer or shorter because it is based on a repeat motif.
http://www.donnascrochetdesigns.com/
http://www.freepatternsdonnascrochetdesigns.com/
December 05, 2007
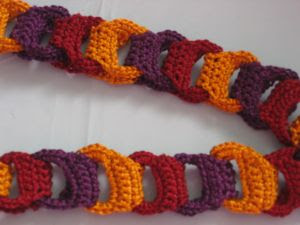
Free Crochet Pattern Small Interlocking Pieces Bele
MATERIALS:
2 (27 yd) skeins DMC Pearl Cotton in Burgundy 814, Gold 976 and Purple 550, size O hook, one swim suit bra hook, needle and invisible thread(optional).
GAUGE: Ea piece is 2-1\2” long- you can get 7-1\2 from one skein
BASIC PIECE:
With DMC and O hook ch-12, sl st to form a ring.
RND 1: ch-1, work 24 sc in ring, sl st top beg sc, ch-1, turn. (24 sts)
ROW 2: Sc next 8 sts, leave remaining sts unworked, ch-1, turn. (8 sts)
ROW 4: Sk sl st and next st, sc next 4 sts, sl st last st, ch-1, turn. (4 sts)
ROW 5-7: Sc ea st across, ch-1, turn.
ROW 8-9: 2 sc 1st st, sc across to last st, 2 sc last st, ch-1, turn. (6 sts)(8 sts)
RND 10: Ch-8, sl st in 1st st row 9, ch-1, work 16 sc in ring, sl st in side last st row 9, fasten off.
PUTTING IT TOGETHER:
Beginning with a burgundy piece slip the swimsuit bra hook (solid section) over the crochet piece pulling it to the center. Fold piece in half. If you like, you can tack the top closed. Slide gold crochet piece through the doubled holes of previous piece. Fold in half and tack closed. Rep with remaining pieces alternating colors. It is important to sew the top of the last piece closed and slide this over the open loop of the swimsuit bra hook.
It's simple and easy to adjust the belt's lenght. It you want to make it larger, just add more pieces. Smaller: use fewer pieces.
Free Crochet Pattern Suede Eggplant Purse
MATERIALS:
1 skein Lion Suede in Eggplant and one Lion Suede Print in Mountaintop, H hook or hook to obtain gauge, small amount of cardboard, needle to take yarn, 5 large snaps, needle and thread.
GAUGE: 3 sc = 1”, 3 rows sc = 1”
FINISHED SIZE: 6” tall X 11-1\2” long
PURSE BODY:
ROW 1: With Suede Print and H hook ch-31, sc 2nd ch from hook, sc ea ch across, ch-1, turn. (30 sts)
ROW 2-47: Sc ea st across, ch-1, turn.
ROW 48: Sc ea st across, join Eggplant, ch-1, turn, fasten off Print.
ROW 49-51: Sc ea st across, ch-1, turn. End row 51 fasten off.
Turn piece so you will now be working across the foundation ch or bottom of row 1, join Eggplant in bottom 1st st, ch-1, sc sa st as beg ch-1, sc bottom ea st across, ch-1, turn. (30 sts)
ROW 2-3: Sc ea st across, ch-1, turn. End row 3 fasten off.
LONG EDGE:
ROW 1: With Eggplant and H hook turn piece so you will now be working across long edge, join end row 51, ch-1, sc sa row as beg ch-1, evenly work sc in end of ea row across, ch-1, turn. (55 sts)
ROW 2-4: Sc ea st across, ch-1, turn. End row 4 fasten off.
Rep on last side of purse body.
SIDE (MAKE FOUR):
RND 1: With Eggplant and H hook ch-9, sc in 2nd ch from hook, sc next 6 ch, 2 sc last ch, turn piece so you will now be working across the bottom of the foundation row, sc ea ch across, sl st top beg sc, ch-1, turn. (16 sts)
RND 2: 2 sc next 2 sts, sc next 5, 2 sc next 3, sc next 5, 2 sc last st, sl st top beg sc, ch-1, turn. (22 sts)
RND 3: 2 sc next 2 sts, sc next 7, 2 sc next 4, sc next 7, 2 sc last 2 sts, sl st top beg sc, ch-1, turn. (30 sts)
RND 4: 2 sc next 4 sts, sc next 9, 2 sc next 6, sc next 9, 2 sc last 2 sts, sl st top beg sc, ch-1, turn. (42 sts)
RND 5: (2 sc next st, sc next st) twice, sc next 11, rep bet () 5 times, sc next 11, rep bet () 3 times, sl st top beg sc, ch-1, turn. (52 sts)
RND 6: Sc ea st around, sl st top beg sc, fasten off.
Using one side as a pattern cut two out of cardboard. With needle and yarn sew two sides tog inserting cardboard as you sew.
Beg at join on rnd 6 of one finished side and line up end of long edge of purse body. With needle and yarn beg sewing at this point and 33 sts on side, fasten off. Rep at sa point other side. With needle and thread sew snaps evenly across opening beg and ending at outer edges.
HANDLE:
ROW 1: with Eggplant and H hook ch-5, sc 2nd ch from hook, sc ea ch across, ch-1, turn. (4 sts)
ROW 2-31: Sc ea st across, ch-1, turn. End row 31 fasten off.
Center strap on top of the purse. With needle and yarn sew last 4 rows ea end of strap to purse top.
November 08, 2007
Why The Rag Doll Family?
Hello!
I have given you the patterns to make all four rag dolls and next you will get their story.
You see, my last years gift buddy loved red-white-blue Americana, rag dolls and romance novels.
Here are two of the three. Tomorrow I'll begin posting the novel.
I hope you enjoy it.
And if you know anyone you'd like to give this gift to, by all means do.
It was meant to be shared!
Happy Holidays!
Captain Andrew Rag Doll Crochet Pattern Free
MATERIALS:
Size 10 crochet thread in Cream, Navy, Black, Maze, White & Red, 6 crochet hook or hook needed to obtain gauge, small amount of stuffing, needle to take crochet thread, fabric paint in black and red, needle and embroidery thread (498 red).
FINISHED SIZE: 7-1\2”
Gauge: 8 hdc sts = 1”, 7 rows hdc = 1”
HEAD:
With Cream thread and 6 hook ch-3, sl st to form a ring.
RND 1: Ch-1, work 8 hdc in ring, sl st top beg hdc, ch-1, turn. (8 sts)
RND 2-3: (2 hdc next st, hdc next st) around, sl st top beg hdc, ch-1, turn. (12 sts)(18 sts)
RND 4-6: Hdc ea st around, sl st top beg hdc, ch-1, turn.
RND 7: (Hdc dec next 2 sts, hdc next 4 sts) around, sl st top beg hdc, ch-1, turn. (15 sts)
RND 8: (Hdc dec next 2 sts, hdc next 3 sts) around, sl st top beg hdc, ch-1, turn. (12 sts)
RND 9: (Hdc dec next 2 sts, hdc next 2 sts) around, sl st top beg hdc, ch-1, turn. (9 sts)
RND 10: Hdc ea st around, sl st top beg hdc, ch-1, turn.
RND 11: Hdc ea st around, join White, fasten off Cream, sl st top beg hdc, ch-1, turn.
RND 12-13: 2 hdc in ea st around, sl st top beg hdc, ch-1, turn. (18 sts)(36 sts)
RND 14-22: Hdc ea st around, sl st top beg hdc, ch-1, turn. End rnd 22 join Navy, fasten off White.
RND 23-28: Hdc ea st around, sl st top beg hdc, ch-1, turn. End rnd 28 do not ch-1.
RND 29: Ch-8, count over 17 sts from join, sl st next st, ch-1, turn, hdc in ea ch across, hdc next 18 sts, (you have just formed one leg opening) sl st top beg hdc, ch-1, turn. (26 sts)
RND 30-34: Hdc ea st around, sl st top beg hdc, ch-1, turn.
RND 35: (Hdc dec next 2 sts, hdc next 4 sts) 4 times, hdc next 2 sts, sl st top beg hdc, ch-1, turn. (22 sts)
RND 36-38: Hdc ea st around, sl st top beg hdc, ch-1, turn.
RND 39: Hdc next st, (hdc dec next 2 sts, hdc next 5 sts) around, sl st top beg hdc, ch-1, turn. (19 sts)
RND 43: Hdc next st, (hdc dec next 2 sts, hdc next 4 sts) around, sl st top beg hdc, ch-1, turn. (16 sts)
RND 44-45: Hdc ea st around, sl st top beg ch-1, turn. End rnd 45 join Black, fasten off White.
RND 46: Sc next 11 sts, hdc next, 2 dc next 3, hdc next, sl st top beg sc, ch-1, turn. (19 sts)
RND 47: Hdc next st, 2 dc next 6, hdc next, sc last 11 sts, sl st top beg hdc, fasten off. (25 sts)
RND 48: With Navy thread and 6 hook join in end of 1st ch formed rnd 29, ch-1, hdc sa st as beg ch-1, hdc next 7 ch, hdc next 18 sts (form 2nd leg opening), sl st top beg hdc, ch-1, turn.
RND 49-65: Rep rnd 31-47. End rnd 65 fasten off.
SOLE (MAKE TWO):
RND 1: with black and 6 hook ch-5, sc 2nd ch from hook, sc to last ch, 2 sc last ch, turn piece so you are now working across the bottom of the foundation ch (in bottom if sts just made), sc across, sl st top beg sc, ch-1, turn. (8 sts)
RND 2: 2 sc next st, sc next, hdc next, 3 dc next 2, hdc next, sc next, 2 sc last st, sl st top beg sc, ch-1, turn. (14 sts)
RND 3: 2 sc next 2 sts, sc next 2, hdc next, 2 dc next 4, hdc next, sc next 2, 2 sc last 2 sts, sl st top beg sc, fasten off. (22 sts)
Stuff body and sew one sole to bottom of ea foot.
PANT CUFF (MAKE TWO):
ROW 1: With Navy and 6 hook ch-4, hdc 3rd ch from hook, hdc next ch, ch-1, turn. (2 sts)
ROW 2-19: Hdc ea st across, sl st top beg hdc, ch-1, turn. End row 19 fasten off.
Place a cuff around bottom of one leg and sew short end tog. Rep on other leg.
PANT STRAIPE (MAKE TWO):
ROW 1: With Maze and 6 hook ch-2, sc 2nd ch from hook, ch-1, turn. (1st)
ROW 2-26: Sc only st, ch-1, turn. End row 26 fasten off.
Sew one stripe down pants leg.
SHIRT COLLAR:
ROW 1: With White and ^ hook ch-5, sc 2nd ch from hook, sc ea ch across, ch-1, turn. (4 sts)
ROW 2: Sk 1st st, sc next 3 sts, ch-1, turn. (3 sts)
ROW 3: Sc next 2 sts, sl st last st, ch-1, turn. (2 sts)
ROW 4: Sk sl st, sc next 2 sts, ch-1, turn. (2 sts)
ROW 5-15: Sc ea st across, ch-1, turn.
ROW 16: Sc next st, 2 sc last st, ch-1, turn. (3 sts)
ROW 17: 2 sc next st, sc last 2 sts, ch-1, turn. (4 sts)
ROW 18: Sc ea st across, fasten off.
Sew around neck.
TIE:
ROW 1: With Navy and 6 hook ch-2, sc 2nd ch from hook, ch-1, turn. (1st)
ROW 2-10: Sc only st, ch-1, turn. End row 10 fasten off.
Sew to center of shirt between collar.
ROW 1: With Navy and 6 hook ch-42, hdc 3rd ch from hook, hdc ea ch across, ch-1, turn. (40 sts)
ROW 2-3: Hdc ea st across, ch-1, turn.
ROW 4-7: Hdc dec next 2 sts, hdc ea st across, ch-1, turn. (39 sts)(38 sts)(37 sts)(36 sts)
ROW 8: Hdc dec next 2 sts, (hdc next 10 sts, hdc dec next 2 sts) twice, hdc last 10 sts, ch-1, turn. (33 sts)
ROW 9: Hdc dec next 2 sts, (hdc next 6 sts, hdc dec next 2 sts) 3 times, hdc last 7 sts, ch-1, turn. (29 sts)
ROW 10: Hdc dec next 2 sts, (hdc next 5 sts, hdc dec next 2 sts) 3 times, hdc next 4 sts, hdc dec last 2 sts, fasten off. (24 sts)
JACKET BOTTOM:
ROW 1: With jacket up-side down so you are working across the bottom of the foundation row in row 1 of jacket, join last st, ch-1, hdc sa st as beg ch-1, hdc ea st across, ch-1, turn. (40 sts)
ROW 2-5: Hdc dec next 2 sts, hdc ea st across, to last 2 sts, hdc dec last 2 sts, ch-1, turn. End row 5 fasten off. (38 sts)(36 sts)(34 sts)(32 sts)
Place jacket around doll and tack center front to hold.
JACKET COLLAR:
ROW 1: With Navy and 6 hook ch-2, sc 2nd ch from hook, ch-1, turn. (1st)
ROW 2-6: Sc only st, ch-1, turn.
ROW 7: 2 sc only st, ch-1, turn. (2 sts)
ROW 8: 2 sc next st, sc next st, ch-1, turn. (3 sts)
ROW 9: Sc next 2 sts, 2 sc last st, ch-1, turn. (4 sts)
ROW 10: Sl st next 2 sts, sc last 2 sts, ch-1, turn. (2 sts)
ROW 11: Sc next 2 sts, ch-1, turn. (2 sts)
ROW 12: Rep row 8. (3 sts)
ROW 13: Rep row 9. (4 sts)
ROW 14: Rep row 10. (2 sts)
ROW 15-48: Sc ea st across, ch-1, turn.
ROW 49-55: Rep row 8-14.
ROW 56: Sc next st, sl st next st, ch-1, turn. (1 st)
ROW 57: Sk sl st, sc only st, ch-1, turn. (1 st)
ROW 58-61: Sc only st, ch-1, turn. End row 61 fasten off.
Place around doll’s neck and sew to jacket edge.
With Navy and 6 hook ch-3, sl st to form a ring.
RND 1: Ch-1, work 10 hdc in ring, sl st top beg hdc, ch-1, turn. (10 sts)
RND 2: (2 hdc next st, hdc next st) around, sl st top beg hdc, ch-1, turn. (15 sts)
RND 3-13: Hdc ea st around, sl st top beg hdc, ch-1, turn. End rnd 13 fasten off.
SLEEVE TRIM (MAKE TWO):
ROW 1: With Maze and 6 hook ch-2, sc 2nd ch from hook, ch-1, turn. (1st)
ROW 2-20: Sc only st, ch-1, turn. End row 20 fasten off.
Sew short ends tog and sew around ea sleeve at the bottom.
HAND\SLEEVE (MAKE TWO):
RND 1: With Cream and 6 hook ch-4, sc 2nd ch from hook, sc next ch, 2 sc last ch, turn so you are now working across the bottom of the foundation ch, sc ea st across, sl st top beg sc, ch-1, turn. (6 sts)
RND 2-5: Sc ea st around, sl st top beg sc, ch-1, turn. End rnd 5 join White and fasten off Cream.
RND 6-10: Sc ea st around, sl st top beg sc, ch-1, turn. End rnd 10 fasten off.
Flatten hand\sleeve piece and sew to the inside of open end of sleeve. Sew ea finished sleeve to ea side of doll at shoulders.
HAT:
With White and 6 hook ch-3, sl st to form a ring.
RND 1: Ch-1, work 8 hdc in ring, sl st top beg hdc, ch-1, turn. (8 sts)
RND 2-4: (2 hdc next st, hdc next st) around, sl st top beg hdc, ch-1, turn. (12 sts)(18 sts)
RND 5: (2 hdc next st, hdc next 2 sts) around, sl st top beg hdc, ch-1, turn. (36 sts)
RND 6-7: Hdc ea st around, sl st top beg hdc, ch-1, turn. End rnd 7 join Navy and fasten off White.
RND 8: Sc ea st around, sl st top beg sc, ch-1, turn.
RND 9: (Sk next st, sc next 3 sts) around, sl st top beg sc, ch-1, turn.
RND 10: Sc next 7 sts, hdc next, 2 dc next 4, 2 trc next 3, 2 dc next 4, hdc next, sc last 7, sl st top beg sc, fasten off. (38 sts)
Flatten slightly and sew to head once the hair has been applied.
HAIR:
With needle and double strand of embroidery floss make small lps over the captain’s head for his hair, knotting and re-threading as needed.
FACE:
Carefully draw on eyes and mouth in black fabric paint. Make a triangle for the nose in red fabric paint, let dry completely.
November 06, 2007
Alexander Free Crochet Pattern
MATERIALS:
Size 10 crochet thread in Cream, Navy, Black, Maze, White & Red, 6 crochet hook or hook needed to obtain gauge, small amount of stuffing, needle to take crochet thread, fabric paint in black and red, needle and embroidery thread (498 red).
FINISHED SIZE: 7-1\2”
Gauge: 8 hdc sts = 1”, 7 rows hdc = 1”
HEAD:
With Cream thread and 6 hook ch-3, sl st to form a ring.
RND 1: Ch-1, work 8 hdc in ring, sl st top beg hdc, ch-1, turn. (8 sts)
RND 2: (2 hdc next st, hdc next st) around, sl st top beg hdc, ch-1, turn. (12 sts)
RND 3-6: Hdc ea st around, sl st top beg hdc, ch-1, turn.
RND 7: (Hdc dec next 2 sts, hdc next 2 sts) around, sl st top beg hdc, ch-1, turn. (9 sts)
RND 8: Hdc ea st around, sl st top beg hdc, ch-1, turn.
RND 9: Work 2 hdc in ea st around, sl st top beg hdc, ch-1, turn. (18 sts)
RND 10: (2 hdc next st, hdc next st) around, sl st top beg hdc, ch-1, turn. (27 sts)
RND 11-18: Hdc ea st around, sl st top beg hdc, ch-1, turn.
RND 19: Ch-5, count over 13 sts from join, sl st next st, ch-1, turn, hdc in ea ch across, hdc next 13 sts, (you have just formed one leg opening) sl st top beg hdc, ch-1, turn. (186 sts)
RND 20-21: Hdc ea st around, sl st top beg hdc, ch-1, turn.
RND 22: (Hdc dec next 2 sts, hdc next 4 sts), sl st top beg hdc, ch-1, turn. (15 sts)
RND 23-24: Hdc ea st around, sl st top beg hdc, ch-1, turn.
RND 25: (Hdc dec next 2 sts, hdc next 3 sts) around, join Red, fasten off Cream, sl st top beg hdc, ch-1, turn. (12 sts)
RND 26: Hdc ea st around, join White, fasten off Red, sl st top beg hdc, ch-1, turn.
RND 27: Hdc ea st around, join Navy, fasten off White, sl st top beg hdc, ch-1, turn.
RND 28: Hdc ea st around, join Red, fasten off Navy, sl st top beg hdc, ch-1, turn.
RND 29: Rep rnd 26.
RND 30: Rep rnd 27.
RND 31: Rep rnd 28.
RND 32: Hdc ea st around, join Black, fasten off Navy, sl st top beg ch-1, turn.
RND 33: Hdc next, 2 dc next 2, hdc next, sc next 8, sl st top beg sc, ch-1, turn. (14 sts)
RND 34: Sc next 8 sts, hdc next, 2 dc next 4, hdc last st, sl st top beg hdc, fasten off. (18 sts)
RND 35: With Cream thread and 6 hook join in end of 1st ch formed rnd 19, ch-1, hdc sa st as beg ch-1, hdc next 4 ch, hdc next 13 sts (form 2nd leg opening), sl st top beg hdc, ch-1, turn. (18 sts)
RND 36-48: Rep rnd 20-33. End rnd 48 fasten off.
SOLE (MAKE TWO):
RND 1: With Black and 6 hook ch-4, sc 2nd ch from hook, sc next, 2 sc last, turn piece so you are now working across the bottom of the foundation ch (in bottom of sts just made), sc across, sl st top beg sc, ch-1, turn. (6 sts)
RND 2: 2 sc next st, sc next, 2 sc next 2, sc next, 2 sc last st, sl st top beg sc, ch-1, turn. (10 sts)
RND 3: 2 sc next st, sc next 2, 2 sc next 3, sc next 2, 2 sc last 2 sts, sl st top beg sc, fasten off. (16 sts)
Stuff body and sew one sole to bottom ea leg.
SHORTS:
RND 1: With Navy and 6 hook ch-32, sl st to form a ring, ch-1, hdc ea ch around, sl st top beg hdc, ch-1, turn. (32 sts)
RND 2: Hdc ea st around, sl st top beg hdc, turn.
RND 3: Ch-7, count over 16 sts from join, sl st that st, ch-1, hdc ea ch and next 16 sts, sl st top beg hdc, ch-1, turn. (1st leg hole formed) (23 sts)
RND 4-6: Hdc ea st around, sl st top beg hdc, ch-1, turn. End rnd 6 fasten off.
RND 7: With Navy and 6 hook join in bottom 1st ch of ch-7, ch-1, hdc sa st as beg ch-1, hdc next 6 ch, hdc next 16 sts, sl st top beg hdc, ch-1, turn. (23 sts)
RND 8-10: Hdc ea st around, sl st top beg hdc, ch-1, turn. End rnd 10 fasten off.
TOP:
ROW 1: With Red and 6 hook join in join of rnd 10 of shorts, ch-1, hdc sa st as beg ch-1, hdc ea st across, ch-1, turn. (32 sts)
ROW 2-3: Hdc ea st across, ch-1, turn.
ROW 4: (Hdc next 9 sts, hdc dec next 2 sts) twice, hdc last 10 sts, ch-1, turn. (30 sts)
ROW 5: (Hdc next 6 sts, hdc dec next 2 sts) 3 times, hdc last 6 sts, ch-1, turn. (27 sts)
ROW 6: (Hdc next 5 sts, hdc dec next 2, hdc next 5), sl st next 3, rep bet (), ch-1, turn. (22 sts)
ROW 7: Hdc next 9 sts, hdc dec next 2, leave remaining sts unworked, ch-1, turn. (10 sts)
ROW 8: Hdc dec next 2 sts, hdc next 3, hdc dec next 2, hdc last 3 sts, ch-1, turn. (8 sts)
ROW 9: Hdc next 2 sts, hdc dec next 2 sts, hdc next 2, hdc dec last 2 sts, fasten off. (6 sts)
ROW 10: With Red and 6 hook join in end row 6, ch-1, hdc sa st as beg ch-1, hdc next 8, hdc dec next 2, leave remaining sts unworked, ch-1, turn. (10 sts)
ROW 11-12: Rep row 8-9. End row 12 fasten off.
Place legs inside short’s legs and pull onto doll. Sew back of shirt closed.
YOLK:
ROW 1: With Red and 6 hook ch-14, hdc 3rd ch from hook, hdc ea ch across, ch-1, turn. (12 sts)
ROW 2-3: Hdc ea st across, ch-1, turn.
ROW 4: Hdc next 3 sts, leave remaining sts unworked, ch-1, turn. (3 sts)
ROW 5: Hdc ea st across, ch-1, turn.
ROW 6: Hdc dec next st, hdc dec last 2 sts, ch-1, turn. (2 sts)
ROW 7-8: rep row 5.
ROW 9: Hdc dec next 2 sts, ch-1, turn. (1 st)
ROW 10-11: Rep row 5. End row 11 fasten off.
ROW 12: With Red and 6 hook join in end row 3, ch-1, hdc sa st as beg ch-1, hdc next 2 sts, leave remaining sts unworked, ch-1, turn. (3 sts)
ROW 13-19: Rep row 5-11. End row 19 fasten off.
Sew around neck edge of shirt.
YOLK STRIPE:
ROW 1: With Navy and 6 hook ch-2, sc 2nd ch from hook, ch-1, turn. (1st)
ROW 2-13: Sc only st, ch-1, turn. End row 13 fasten off.
Sew stripe across back of yolk.
SLEEVES (MAKE TWO):
RND 1: Ch-1, work 10 hdc in ring, sl st top beg hdc, ch-1, turn. (10 sts)
RND 2-8: Hdc ea st around, sl st top beg hdc, ch-1, turn.
RND 9: (Hdc dec next 2 sts, hdc next 3 sts) twice, join Navy, fasten off Red, sl st top beg hdc, ch-1, turn. (8 sts)
RND 10: Hdc ea st around, join Cream, fasten off Navy, sl st top beg hdc, ch-1, turn.
RND 11-12: Hdc ea st around, sl st top beg hdc, ch-1, turn. End rnd 12 lay piece flat and sl st through both thickness’ to close, fasten off.
Sew one sleeve to either side of doll at shoulders.
HAIR:
With needle and double strand of embroidery floss make small lps over the captain’s head for his hair, knotting and re-threading as needed.
FACE:
Carefully draw on eyes and mouth in black fabric paint. Make a triangle nose in red fabric paint, let dry completely.
November 04, 2007
Free Crochet Pattern Small Rag Doll
ABBIGAIL & ADUREY ANN
MATERIALS:
Size 10 crochet thread in Cream, Navy, Black, Maze, White & Red, 6 crochet hook or hook needed to obtain gauge, small amount of stuffing, needle to take crochet thread, fabric paint in black and red, needle and embroidery thread (498 red).
FINISHED SIZE: 7”
Gauge: 8 hdc sts = 1”, 7 rows hdc = 1”
HEAD:
With Cream thread and 6 hook ch-3, sl st to form a ring.
RND 1: Ch-1, work 8 hdc in ring, sl st top beg hdc, ch-1, turn. (8 sts)
RND 2: (2 hdc next st, hdc next st) around, sl st top beg hdc, ch-1, turn. (12 sts)
RND 3-5: Hdc ea st around, sl st top beg hdc, ch-1, turn.
RND 6: (Hdc dec next 2 sts, hdc next 2 sts) around, sl st top beg hdc, ch-1, turn. (9 sts)
RND 7: Hdc ea st around, sl st top beg hdc, ch-1, turn.
RND 8: Work 2 hdc in ea st around, sl st top beg hdc, ch-1, turn. (18 sts)
RND 9: (2 hdc next st, hdc next st) around, sl st top beg hdc, ch-1, turn. (27 sts)
RND 10-16: Hdc ea st around, sl st top beg hdc, ch-1, turn.
RND 17: Ch-5, count over 13 sts from join, sl st next st, ch-1, turn, hdc in ea ch across, hdc next 13 sts, (you have just formed one leg opening) sl st top beg hdc, ch-1, turn. (186 sts)
RND 18: Hdc ea st around, sl st top beg hdc, ch-1, turn.
RND 19: (Hdc dec next 2 sts, hdc next 4 sts), sl st top beg hdc, ch-1, turn. (15 sts)
RND 20: Hdc ea st around, sl st top beg hdc, ch-1, turn.
RND 21: (Hdc dec next 2 sts, hdc next 3 sts) around, join Red, fasten off Cream, sl st top beg hdc, ch-1, turn. (12 sts)
RND 22: Hdc ea st around, join White, fasten off Red, sl st top beg hdc, ch-1, turn.
RND 23: Hdc ea st around, join Navy, fasten off White, sl st top beg hdc, ch-1, turn.
RND 24: Hdc ea st around, join Red, fasten off Navy, sl st top beg hdc, ch-1, turn.
RND 25: Rep rnd 22
RND 26: Rep rnd 23.
RND 27: Rep rnd 24.
RND 28: Hdc ea st around, join Black, fasten off Navy, sl st top beg ch-1, turn.
RND 29: Hdc next, 2 dc next 2, hdc next, sc next 8, sl st top beg sc, ch-1, turn. (14 sts)
RND 30: Sc next 8 sts, hdc next, 2 dc next 4, hdc last st, sl st top beg hdc, fasten off. (18 sts)
RND 31: With Cream thread and 6 hook join in end of 1st ch formed rnd 19, ch-1, hdc sa st as beg ch-1, hdc next 4 ch, hdc next 13 sts (form 2nd leg opening), sl st top beg hdc, ch-1, turn. (18 sts)
RND 32-44: Rep rnd 18-30. End rnd 44 fasten off.
SOLE (MAKE TWO):
RND 1: With Black and 6 hook ch-4, sc 2nd ch from hook, sc next, 2 sc last, turn piece so you are now working across the bottom of the foundation ch (in bottom of sts just made), sc across, sl st top beg sc, ch-1, turn. (6 sts)
RND 2: 2 sc next st, sc next, 2 sc next 2, sc next, 2 sc last st, sl st top beg sc, ch-1, turn. (10 sts)
RND 3: 2 sc next st, sc next 2, 2 sc next 3, sc next 2, 2 sc last 2 sts, sl st top beg sc, fasten off. (16 sts)
Stuff body and sew one sole to bottom ea leg.
BLOOMERS:
RND 1: With White and 6 hook ch-32, sl st to form a ring, ch-1, hdc ea ch around, sl st top beg hdc, ch-1, turn. (32 sts)
RND 2: Hdc ea st around, sl st top beg hdc, turn.
RND 3: Ch-7, count over 16 sts from join, sl st that st, ch-1, hdc ea ch and next 16 sts, sl st top beg hdc, ch-1, turn. (1st leg hole formed) (23 sts)
RND 4-6: Hdc ea st around, sl st top beg hdc, ch-1, turn. End rnd 6 fasten off.
RND 7: Hdc next st, (hdc dec next 2 sts) around, sl st top beg hdc, turn. (12 sts)
RND 8: (Ch-4, sl st next st) around, fasten off.
RND 9: With White and 6 hook join in bottom 1st ch of ch-7, ch-1, hdc sa st as beg ch-1, hdc next 6 ch, hdc next 16 sts, sl st top beg hdc, ch-1, turn. (23 sts)
RND 10-12: Hdc ea st around, sl st top beg hdc, ch-1, turn. End rnd 10 fasten off.
RND 11-14: Rep rnd 7-9. End rnd 14 fasten off.
TOP TRIM FOR BLOOMERS:
With White and 6 hook join in any st on top edge of bloomers, (ch-4, sl st nest st) around, fasten off.
-Make one for ea doll.
DRESS:
ROW 1: With thread and 6 hook ch-24, hdc 3rd ch from hook, hdc ea ch across, ch-1, turn. (22 sts)
ROW 2: Hdc next st, (2 hdc next, hdc next 2) around, sl st top beg hdc, ch-1, turn. (29 sts)
ROW 3: Hdc next 2 sts, (2 hdc next, hdc next 2) around, sl st top beg hdc, ch-1, turn. (38 sts)
ROW 4: Hdc next 2 sts, (2 hdc next, hdc next 3) around, sl st top beg hdc, ch-1, turn. (37 sts)
ROW 5-11: Hdc ea st around, sl st top beg hdc, ch-1, turn. End rnd 11 fasten off.
-Make one in Red and one in Navy. Place around doll and sew back closed.
SLEEVE:
With thread and 6 hook ch-3, sl st to form a ring.
RND 1: Ch-1, work 8 hdc in ring, sl st top beg hdc, ch-1, turn. (8 sts)
RND 2-3: (2 hdc next st, hdc next st) around, sl st top beg hdc, ch-1, turn. (12 sts)(18 sts)
RND 3-4: Hdc ea st around, sl st top beg hdc, ch-1, turn.
RND 5: (Hdc dec next 2 sts, hdc next st) around, sl st top beg hdc, ch-1, turn. (12 sts)
RND 6: Hdc ea st around, sl st top beg hdc, turn.
RND 7: (Ch-4, sl st in bk lp) around, off.
RND 8: With Cream and 6 hook join in any left over lp from rnd 7, ch-1, hdc sa st as beg ch-1, hdc ea st around, sl st top beg hdc, ch-1, turn. (12 sts)
RND 9: Hdc ea st around, sl st top beg hdc, ch-1, turn.
RND 10: (Hdc dec next 2 sts, hdc next st) around, sl st top beg hdc, ch-1, turn. (8 sts)
RND 11-13: Rep rnd 9. End rnd 13 lay piece flat and sl st through both thickness’ to close, fasten off.
-Make 2 sleeves in Red and 2 sleeves in Navy. Sew one set of sleeves to ea doll at shoulders.
APRON TIE:
ROW 1: With White & 6 hook ch-2, sc 2nd ch from hook, ch-1, turn. (1st)
ROW 2-80: Sc only st, ch-1, turn. End row 80 fasten off.
APRON:
ROW 1: With White and 6 hook count over 33 rows on tie, join end of that row, ch-1, hdc next 14 sts, leave remaining unworked, ch-1, turn. (14 sts)
ROW 2-6: Hdc ea st across, ch-1, turn. End row 6 fasten off.
APRON STRAPS:
ROW 1: With White and 6 hook join in 3rd st on top edge of apron, ch-1, sc next st, ch-1, turn. (1 st)
ROW 2-15: Sc only st, ch-1, turn. End row 15 count over 9 sts from end of apron on tie, sl st, fasten off.
Rep row 1-15 on other end. End row 15 do not fasten off, work (ch-4, sl st next st) across strap edge, across apron top bet straps and across edge of 2nd strap, fasten off.
-Make one for ea doll.
HAIR:
With needle and double strand of embroidery floss make small lps over the captain’s head for his hair, knotting and re-threading as needed.
FACE:
Carefully draw on eyes and mouth in black fabric paint. Make a triangle for the nose in red fabric paint, let dry completely.
Abbigail and Audrey are small but still fun to play with.
I made them for a friend who likes rag dolls. They also have a brother and a father that'll be posted soon.
Enjoy and keep crocheting!
November 03, 2007
Free Crochet Patterns Website!
As you probably already know I have my own website Donna's Crochet Designs where I sale my orginial patterns. I like to use my blog as my free pattern link to keep things a little less complicated.
Well, I've gotten another website:
http://www.freepatternsdonnascrochetdesigns.com/ (I know its a mouthful)
As of right now I have 45 patterns on the site. Some link back to here, but most are found on the site. That doesn't mean I won't still be posting patterns here, there just will be more found there.
I just wanted to let you all know it was out there.
Tomorrow I'll be posting another pattern here. It is of a couple of rag dolls done in thread. I made them for my Christmas buddy and just stumbled over the pattern again this week and knew I just had to post it here!
http://www.donnascrochetdesigns.com/
http://www.freepatternsdonnascrochetdesigns.com/
Crocheting with Chenille Stems
This month many of my designs require the use of chenille stems as part of "their body". (First picture is of Peppermint Swirl Candy Kids and the second is Gum Drop Candy Kids pattern at my website)
Chenille stems are easy to find. They are usually found in the Kids Craft area of most craft stores and Wal-mart.
They bend easy and hold their shape well. They are easy to cut with a pair of scissors, all through I wouldn’t recommend using your best pair, and they have no sharp edges.
They have no sharp edges that is until you cut them. Where the stem has been cut will be sharp and jagged and will poke through your crochet piece. I have come up with two ways to prevent this.
First way: Instead of folding the cut stem in half and then twisting to hold (see Candy Kids) find the center of your cut stem and fold each end toward the center and then twist. The twisting will cover the jagged end and will give you two rounded ends to insert into your crochet piece.
Second way: I call this the lazy man’s way. If you forgot or don’t want to go to all the trouble of finding the center, folding each end in...,etc, then fold and twist. Once twisted lay the cut end on a table or other hard surface, place your scissors over the cut end and press. It may take several attempts, but eventually all the jagged edges will be flatten and pushed to the inside of the stem.
I personally like the first way best. It takes less time and you don’t get poked as much.
I’d also like to add that I have found that it doesn’t matter what color the chenille stems are. I ran out of the white ones I was using and ended up using some black ones I had left from another project. I found that the cream and white threads covered the stems color completely. Great way to use up those odds and ends just laying around.
October 28, 2007
Same Necklace but done in Beads!
Free Necklace w Butterfly Charms Crochet Pattern
THREAD CHAIN NECKLACE WITH BUTTERFLY CHARMS
MATERIALS:
size 10 crochet thread in Red Victory, size 7 crochet hook, large eye beading needle, DMC size 5 metallic in Gold, size O hook, 21 butterfly charms, necklace clasp, needle and invisible thread.
FINISHED SIZE: 22”
BUTTERFLY CHARM STRANDS:
With large eye beading needle and red crochet thread, thread the 21 charms onto thread, remove needle.
With thread, 7 hook and leaving long tails, ch-45, (slide charm, ch-30) twice, slide charm, ch-45, fasten off.
-Make 7.
THREAD CHAIN STRANDS:
With red thread, 7 hook and leaving long tails, ch-150, fasten off.
-Make 14.
GOLD CHAIN STRANDS:
With DMC gold, O hook and leaving long tails, ch-175, fasten off.
-Make 3.
NECKLACE BELL CAPS:
With DMC gold and O hook ch-4, sl st to form a ring.
RND 1: Ch-1, work 8 hdc in ring, sl st top beg hdc, ch-1, turn. (8 sts)
RND 2: (2 hdc next st, hdc next st) around, sl st top beg hdc, ch-1, turn. (12 sts)
RND 3-4: Hdc ea st around, sl st top beg hdc, ch-1, turn.
RND 5: Rep rnd 2, fasten off. (18 sts)
-Make 2.
PUTTING IT ALL TOGETHER:
On a flat surface lay all chain strands tog. Knot at ea end, trim excess. With needle and invisible thread, sew one bell cap to ea end of the necklace covering knot. Sew clasp to ea bell cap.
What is so great about this necklace is how easy it is to make and put together.
It is also very verstile. You can change the charms to buttons. You can change the color combinations and even add strands of beads.
http://www.donnascrochetdesigns.com/
September 29, 2007
Crocheting with Fun Fur Eyelash
Mrs. Frank N. Stein, don't you think her hair looks much scarier done in eyelash instead of 4 ply?
But...(you knew there was a but didn’t you) I like the look and feel of the eyelash yarns for certain projects. Like some of the patterns this month and yes next month too.
So here are a few tips:
-always roll the skein into a ball before trying to work with it. I don’t know why, but when it gets close to the end it falls apart and tangles.
-keep a pair of scissors close by. Not for cutting, but for frogging or unraveling stitches. It’s the only way I’ve found to get the stitches to come apart. What you do is carefully pull at the little bits that make the yarn eyelash with the point of your scissors this gets them out of the way so the stitchcan release and not knot, thus ruining an expensive yarn.
I wish I had known that one when I first used eyelash yarn. I probably lost close to a skein by unsuccessfully frogging a project, tangling the yarn beyond rescue.
Last but not least, I’ve found that eyelash goes further when you pair it with a thicker yarn like regular 4 ply yarn or a specialty yarn like Lion Suede and you often achieve close to the same look and you’re not tempted to give it a "hair-cut"!
I’ll keep using eyelash type yarns, but sparingly. With this, sometimes too much can ruin a good thing!
Spider in a Box Free Crochet Pattern
Materials:
Small amount of Lion Fun Fur Eyelash yarn in Black, size F crochet hook, 2 black chenille stems, craft glue, small amount of tissue paper and a small box.
Spider:
With Black and F hook ch-3, sl st to form a ring.
Rnd 1: Ch-1, work 12 hdc in ring, sl st top beg hdc, ch-1, turn,
Rnd 2-3: (2 hdc next st, hdc next st) around, sl st top beg hdc, ch-1, turn. (18 sts) (27 sts)
Rnd 4-6: Hdc ea st around, sl st top beg hdc, ch-1, turn.
Rnd 7-9: (Hdc dec next 2 sts, hdc next st) around, sl st top beg hdc, ch-1, turn. (18 sts)(12 sts)(8 sts) Do not stuff spider.
Rnd 10: (Hdc dec next 2 sts) around, sl st top beg hdc, fasten off. (4 sts)
Putting it Together:
Cut the 2 chenille stems in half. Twist together all four stems in the center. Bend stems to look like legs. Glue to spider.
Place a small amount of tissue paper into the box. I used a bakery box because I felt it kept more in tune with the Trick or Treat theme of this project.
Cut a small amount of eyelash yarn and attach to the center of the spider. Attach other end to the lid of the box. Close lid.
Now offer someone you know a little Halloween treat and watch their reaction when they open the box and discover a trick instead.
HAPPY HALLOWEEN!
http://www.donnascrochetdesigns.com/
Free Crochet Pattern: Devil's Horns Hair Clips
Devils' Horns Hair Clips Free Crochet Pattern
MATERIALS:
Small amount of size 10 crochet thread in red, size 7 crochet hook, small amount of stuffing, hair clips and craft glue.
FINISHED SIZE: Ea horn is about 1” tall
Gauge: 4 hdc = 1\2”, 4 rows = 1\2”
HORN:
With Red thread and 7 hook ch-3, sl st to form a ring.
RND 1: Ch-1, work 12 hdc in ring, sl st top beg hdc, ch-1, turn. (12 sts)
RND 2-3: (2 hdc next st, hdc next st) around, sl st top beg hdc, ch-1, turn. (18 sts)(27 sts)
RND 4: Back Loop hdc ea st around, sl st top beg hdc, c h-1, turn.
RND 5: Hdc ea st around, sl st top beg hdc, ch-1, turn.
RND 6: Hdc next 2 sts, (hdc dec next 2, hdc next 3) around, sl st top beg hdc, ch-1, turn. (22 sts)
RND 7: Hdc next st, (hdc dec next 2 sts, hdc next 5 sts) around, sl st top beg hdc, ch-1, turn. (19 sts)
RND 8: Hdc next st, (hdc dec next 2 sts, hdc next 4 sts) around, sl st top beg hdc, ch-1, turn. (16 sts)
RND 9-10: (Hdc dec next 2 sts, hdc next 2 sts) around, sl st top beg hdc, ch-1, turn. (12 sts)(9 sts) Stuff horn.
RND 11: (Hdc dec next 2 sts, hdc next st) around, sl st top beg hdc, ch-1, turn. (6 sts)
RND 12: (Hdc dec next 2 sts) around, sl st top beg hdc, fasten off.
-make 2. Glue to hair clips of insert bobbie pins.
HAPPY HALLOWEEN!
http://www.donnascrochetdesigns.com/
September 26, 2007
Christmas Tree Skirt Cal
I'm a member of crochetville forum. I love the place, everyone is so helpful and friendly.
Someone started a thread about doing a Christmas tree skirt cal. I thought I'd do one, afterall I've only been meaning to get a new three skirt for several years now. --so the story of my life!
Anyway, I got to playing with the color combinations on my design and couldn't decide which one I wanted to make. So I asked my husband, he did pick eiher of the two I was favoring. Then I asked my daughter and guess what-yes, that's right she picked still a different one for me to make. I'm afraid that is how it always goes in my family.
Then I decided to post them on the thread and let the people at crochetville help me make up my mind. Funny thing is, no one still picked the one I had been leaning toward--The red & white one--but asked for the instructions to the others.
I posted there and thought why not share them with you as well.
All went well until I tried to upload the picture of the graph for the Red & Green Tree Skirt. It just wouldn't load. It wouldn't load at photo bucket either. Go figure, I must have done something wrong--yet again!(long sigh) So I put my orginial designs up just incase anyone would at least like to see the Red & Green one. You can easily figure out how to make it by looking at the other instructions.
I still haven't made up my mind as to which one I'll make. I'm still leaning to the Red & White, but was thinking maybe of doing different colors...
Which ever I chose I'll be sure and post the finished one.
Enjoy!
http://www.donnascrochetdesigns.com/
Red & White Christmas Tree Skirt Free Crochet Pattern
4 ply yarn and, size H hook or hook to obtain gauge.
GAUGE: 1 square = 2”
BASIC BLOCK:
With H hook and yarn, ch-4, sl st to form a ring.
RND 1: Ch-1, (3 sc, ch-2) 4 times in ring, sl st top beg sc, DO NOT TURN.
RND 2: Ch-3 (1st dc), dc in next 2 sts, *(dc, ch-2, dc) in corner, dc next 3 sts, rep from * 3 times, (dc, ch-2, dc) last corner, sl st top beg ch-3, fasten off. One block made.
JOINING RND: as in rnd 2, ch-3 (1st dc), dc next 2 sts, (dc, ch-1,) next corner, ch-1 in corresponding corner of block 2, dc in sa corner on block 1, dc next 3 sts, (dc, ch-1) next corner, ch-1, in next corresponding corner of block 2, dc in sa corner block 1, *dc next 3 sts, (dc, ch-2, dc) next corner, rep from * twice, sl st top beg ch-3, fasten off.
TWO COLOR BLOCK:
With H hook and color A, ch-4, sl st to form a ring.
RND 1: Ch-1, *3 sc, ch-2, 3 sc ch-1* join B continuing to work color A in back of sts, ch-1, rep between **, pick up A, ch-1, sl st top beg sc.
RND 2: Working color A & carrying color B behind worked sts: Ch-3 (1st dc), dc next 2 sts, (dc, ch-2, dc) next corner, dc next 3, (dc, ch-1) next corner, pick up color B, (ch-1, dc) sa corner, now working color A behind sts as you work dc next 3, (dc, ch-2, dc) next corner, dc next 3, (dc, ch-1) next corner, pick up A, (ch-1, dc) as corner, sl st top beg ch-3, fasten off.
Join as for basic block only continuing two-color block as established.
FINISHING:
RND 1: With yarn and H hook, join in and st on outer edge of piece, ch-1, even work sc around afghan and working (2 sc, ch-2, 2 sc) in each corner, sl st top beg sc, ch-3, turn.
RND 2: Dc ea st around working (2 dc, ch-2, 2 dc) in each corner, sl st top beg ch-3, fasten off.
First Blues Christmas Tree Skirt Free Crochet Pattern
Here are the basic instructions:
MATERIALS:
4 ply yarn and size H hook or hook to obtain gauge.
GAUGE: 1 square = 2”
BASIC BLOCK:
With H hook and yarn, ch-4, sl st to form a ring.
RND 1: Ch-1, (3 sc, ch-2) 4 times in ring, sl st top beg sc, DO NOT TURN.
RND 2: Ch-3 (1st dc), dc in next 2 sts, *(dc, ch-2, dc) in corner, dc next 3 sts, rep from * 3 times, (dc, ch-2, dc) last corner, sl st top beg ch-3, fasten off. One block made.
JOINING RND: as in rnd 2, ch-3 (1st dc), dc next 2 sts, (dc, ch-1,) next corner, ch-1 in corresponding corner of block 2, dc in sa corner on block 1, dc next 3 sts, (dc, ch-1) next corner, ch-1, in next corresponding corner of block 2, dc in sa corner block 1, *dc next 3 sts, (dc, ch-2, dc) next corner, rep from * twice, sl st top beg ch-3, fasten off.
TWO COLOR BLOCK:
With H hook and color A, ch-4, sl st to form a ring.
RND 1: Ch-1, *3 sc, ch-2, 3 sc ch-1* join B continuing to work color A in back of sts, ch-1, rep between **, pick up A, ch-1, sl st top beg sc.
RND 2: Working color A & carrying color B behind worked sts: Ch-3 (1st dc), dc next 2 sts, (dc, ch-2, dc) next corner, dc next 3, (dc, ch-1) next corner, pick up color B, (ch-1, dc) sa corner, now working color A behind sts as you work dc next 3, (dc, ch-2, dc) next corner, dc next 3, (dc, ch-1) next corner, pick up A, (ch-1, dc) as corner, sl st top beg ch-3, fasten off.
Join as for basic block only continuing two-color block as established.
Half Block:
With yarn and H hook ch-4, sl st to form a ring.
Rnd 1: Ch-1 work 4 sc, ch-2, 4 sc in ring, turn.
Rnd 2: Ch-3, dc ea st and work (dc, ch-2, dc) in ch-2, sp, fasten off.
Joining is written to be done at corners only. If you would like to join all stitches simply make stitch, sl st in coresponding st in block to be attached, etc.
Work according to graph. I like to begin at the bottom and work my way up going left to right.
FINISHING:
RND 1: With yarn and H hook, join in and st on outer edge of piece, ch-1, even work sc around afghan and working (2 sc, ch-2, 2 sc) in each corner, sl st top beg sc, ch-3, turn.
RND 2: Dc ea st around working (2 dc, ch-2, 2 dc) in each corner, sl st top beg ch-3, fasten off.
Second Blues Christmas Tree Skirt Free Crochet Pattern
4 ply yarn and size H hook or hook to obtain gauge.
GAUGE: 1 square = 2”
BASIC BLOCK:
With H hook and yarn, ch-4, sl st to form a ring.
RND 1: Ch-1, (3 sc, ch-2) 4 times in ring, sl st top beg sc, DO NOT TURN.
RND 2: Ch-3 (1st dc), dc in next 2 sts, *(dc, ch-2, dc) in corner, dc next 3 sts, rep from * 3 times, (dc, ch-2, dc) last corner, sl st top beg ch-3, fasten off. One block made.
JOINING RND: as in rnd 2, ch-3 (1st dc), dc next 2 sts, (dc, ch-1,) next corner, ch-1 in corresponding corner of block 2, dc in sa corner on block 1, dc next 3 sts, (dc, ch-1) next corner, ch-1, in next corresponding corner of block 2, dc in sa corner block 1, *dc next 3 sts, (dc, ch-2, dc) next corner, rep from * twice, sl st top beg ch-3, fasten off.
TWO COLOR BLOCK:
With H hook and color A, ch-4, sl st to form a ring.
RND 1: Ch-1, *3 sc, ch-2, 3 sc ch-1* join B continuing to work color A in back of sts, ch-1, rep between **, pick up A, ch-1, sl st top beg sc.
RND 2: Working color A & carrying color B behind worked sts: Ch-3 (1st dc), dc next 2 sts, (dc, ch-2, dc) next corner, dc next 3, (dc, ch-1) next corner, pick up color B, (ch-1, dc) sa corner, now working color A behind sts as you work dc next 3, (dc, ch-2, dc) next corner, dc next 3, (dc, ch-1) next corner, pick up A, (ch-1, dc) as corner, sl st top beg ch-3, fasten off.
Join as for basic block only continuing two-color block as established.
Work according to graph. I like to begin at the bottom and work my way up going right to left.
RND 1: With yarn and H hook, join in and st on outer edge of tree skirt, ch-1, even work sc around afghan and working (2 sc, ch-2, 2 sc) in each corner, sl st top beg sc, ch-3, turn.
RND 2: Dc ea st around working (2 dc, ch-2, 2 dc) in each corner, sl st top beg ch-3, fasten off.