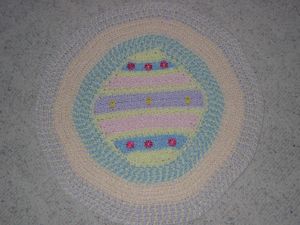
May 08, 2007

More Ideas For Crochet Patches

MORE IDEAS FOR CROCHET PATCHES!

Everyone knows you can add patches to jeans, shirts and jackets, but how about adding some to a purchased purse.


Or how about using one as a tie back for your curtains. Great way to personalize your home with your hobby!


Instead of crochting the patch in DMC or Crochet Thread how about you do it in 4 ply yarns!
You'll get the same detail and look but at a much larger size. Then you could....
Use the patches as a decortive motif to a pillow or even as the center in a quilting square!


Just use one and you have a matching coaster!


Add them to a hat--purchased or crochet!


To decorate a baby's bib!


Add a decorative touch to guests towels. Not only would they look nice a your powder room, but would make a nice gift as well.


Great to decorate a purchased pair of socks!
There are many ways to use crochet patches! Just let your imagine run loose! Add then to sachets, doll dresses, place mats and table runners--go wild!


Free Crochet Pattern Child's Sun Hat


SIMPLE CHILD'S SUN HAT CROCHET PATTERN

MATERIALS:
4ply yarn in any color you like, H hook or hook to obtain gauge and needle to take yarn.


GAUGE: 5 hdc = 1-1\2”, 5 rows hdc = 2”


FINISHED SIZE: 7-1\2” across top and 28” around outside of hat.


HAT TOP:
ROW 1: With yarn and H hook ch-16, hdc 3rd ch from hook, hdc ea ch across, ch-1, turn. (14 sts)


ROW 2-5: 2 hdc next st, hdc to last st, 2 hdc last st, ch-1, turn. (16 sts)


ROW 6-15: Hdc ea st across, ch-1, turn.


ROW 16-19: Hdc dec next 2 sts, hdc across to last 2 sts, hdc dec last 2 sts, ch-1, turn. End row 19 fasten off. (20 sts)(18 sts)(16 sts)(14 sts)


SIDE OF HAT:
ROW 1: With yarn and H hook ch-12, hdc 3rd ch from hook, hdc ea ch across, ch-1, turn. (10 sts)


ROW 2-60: Hdc ea st across, ch-1, turn. End row 60 fasten off.


With needle and yarn sew row 60 to row 1 to form a circle. With yarn and H hook evenly sc through both thickness of top and side of hat around, sl st top beg sc, fasten off.


BRIM:
RND 1: With yarn and H hook join in end of any rnd of bottom of side, ch-1, work 2 hdc in end of ea row around, sl st top beg hdc, ch-1, turn. (120 sts)


RND 2-4: Hdc ea st around, sl st top beg hdc, ch-1, turn. End rnd 4 fasten off.

www.donnascrochetdesigns.com

Free Baby Bib Crochet Pattern

SIMPLE BABY'S BIB

MATERIALS:
Bernat Baby Coordinates yarn in color of your choice and size F.


GAUGE: 4 hdc sts = 1”, 5 rows hdc = 1-1\2”


FINISHED SIZE: 6-1\2” across widest point X 7-1\4” long


BIB:
ROW 1: With yarn and F hook ch-18, hdc 3rd ch from hook, hdc ea ch across, ch-1, turn. (16 sts)


ROW 2-11: 2 hdc next st, hdc ea st across, ch-1, turn. (17 sts)(18 sts)(19 sts)(20 sts)(21 sts)(22 sts)(23 sts)(24 sts)(25 sts)(26 sts)


ROW 12-19: Hdc ea st across, ch-1, turn.


ROW 20-23: Hdc dec next 2 sts, hdc ea st across, ch-1, turn. (25 sts)(24 sts)(23 sts)(22 sts)


ROW 24: Hdc dec next 2 sts, hdc next 3 sts, leave remaining sts unworked, ch-1, turn. (4 sts)


ROW 25: Hdc next 2 sts, hdc dec last 2 sts, ch-1, turn. (3 sts)


ROW 26: Hdc dec next 2 sts, hdc next st, ch-1, turn. (2 sts)


ROW 27: Hdc dec next 2 sts, fasten off. (1 st)


ROW 28: With yarn and F hook join in end row 23, ch-1, work hdc dec in sa st as beg ch-1, and next st, hdc next 3 sts, leave remaining sts unworked, ch-1, turn. (4 sts)


ROW 29-31: Rep row 25-27.


RND 32: Evenly sc in ea st and row around outer edge and working 3 sc in only st row 27 and row 31, sl st top beg sc, fasten off.


TIES:
ROW 1: With yarn and F hook join in 2nd st of 3 sc group, ch-1, sc sa st as beg ch-1, leave remaining sts unworked, ch-1, turn. (1 st)


ROW 2-68: Sc only st, ch-1, turn. End row 68 fasten off.


Rep at other 3 sc group.

www.donnascrochetdesigns.com

April 23, 2007

A Tip to Better Help Consistency in Gauge

Anyone who has ever crocheted knows how important gauge is. It affects the size of your finished project. But what if your problem is consistency in your gauge?
There is really no easy way to teach someone this other than to tell them to crochet and you'll soon learn how to hold the yarn so that your stitches come out uniform.
That's all well and good so long as you aren't like my thirteen year old daughter who tried to make a square pillow and ended up with a very oddly shaped triangle with the same number of stitches at the end as when she began.
I never could explain tension and holding the yarn so that she understood. So I came up with this solution:
I threaded a bead onto her yarn. It was big enough that the yarn could easily pass through it, but still small enough she could easily keep it between her pinkie and the palm side of her hand. By doing this it forced her to keep a constant grip on the bead thus enabling her stitches to become regular row after row.
It worked for her and I hope it can work for other struggling beginners!

Why Use DMC Pearl Cotton Instead of Crochet Thread?

Why use size 5 DMC Pearl Cotton thread inside of size 10 crochet thread?
Both are close in gauge when crocheting.
Some of the newer versions of crochet thread are as soft as the DMC, though not all.
The answer is simple: color variety.
With crochet thread you can find one maybe two colors of blue, pink, green and yellow, but rarely at the same store. They usually have white, black, red, green, pink, purple and maybe yellow or recently I found orange.
DMC almost always have five or so skeins in varying hues of the same color. Si if you want to make a necklace to match a favorite dress or shirt you're more likely to find it using the DMC Pearl Cotton than in the crochet thread.
DMC is found in the needlework-cross stitch-embroidery isles in most craft stores. The hanging ones are ususally the size 5 thread with size 8 and 12 in balls underneath. They are the twisted skeins usually hanging on a peg board. You will need to untwist the thread and roll it into a ball so it doesn't tangle when you try to use it, but each 27 yard skein makes a ball about the size of a quarter and is fairly quick to untwist and roll.
That brings me to the other reason I like the DMC thread: the 27 yard skeins.
Crochet thread is usually found in a 250-350 yard range, which is great if you are making something large but over kill if you're just making a necklace.
Sure crochet thread will work, but there are more color variety with DMC Pearl Cotton.


P.S. If any one is wondering why I no longer put the color numbers I use for my designs samples it is because I want to encourage you to go out and look at all the colors out there and then pick the one that you like best.


www.donnascrochetdesigns.com

April 21, 2007

Changing Faces on Baby Stackers Crochet Pattern


What are the differences between these crochet animal heads?
Lets take them one by one.
The Dog head versas the Bunny head.
Both have the same eyes, same muzzle and nose. The size of the head is the same, only the colors used and the ears are different.
The Dog head versas the Bear head.
Both use the same eyes and nose. The muzzles are different. The dog has two small muzzles sewn next to each other while the bear only has one large one. Again the only real differences are the colors of yarn used and the ears, but if you look closely to the bear's ears you will notice how simular they are to the shape of the eyes and are really one in the same.
Last is the Dog head versas the Cat head. Again same eyes and nose, but different ears and the cat has a few stitches of embroidary of its muzzle instead of the sewn on one of the dog.
Can you tell where I am going with this?
Use your imaginations! Just because you see an item being used in one way doesn't mean you can't change it to suit your needs. Don't like dogs? So change it into a cat. The person you are making this for has their nursey done in bunnys, so change it into a bunny.
Nothing is ever written in stone.
Change the colors you use.
Change the type and weight of yarns.
Take it and put it to a totally different use. How about sewing one of the heads onto a body you've sewn and stuffed. Or use them as soft balls for a baby to play with. Or get really bold and string a bunch of the heads together and use it as a scarf this winter.
My point is take it and run with it!
Somethimes running with scissors is okay.
Just don't mistake getting crative with someone's pattern and then calling it your own or you could end up with a lot of problems leagelly.

What is 4 ply Yarn?

A new person to crochet recently asked me what the 4-ply yarn I stated I used in my pattern meant and if it had anything to do with gauge.
4 ply is the weight of the yarn or thickness and is also called medium . It really means 4 strands of thinner yarn have been twisted together to produce that yarn. You find the weight of the yarn usually just above the name of the yarn something like: Worsted - Medium - 4. Worsted means several strands of thinner yarn have been twisted together to make up the yarn. Medium is the over all thickness you'll achieve in your finished piece and 4 is the number of worsted yarns
4 ply is a weight more commonly used in crochet. One of the easiest to find brands of 4 ply yarn is Red Heart. Usually Wal-mart, Joanns, Michaels, etc have a large variety of colors . I always like to list the weight or type of yarn I used to make the item from the pattern so if it is a special type of yarn you know that up front.
There are of course thinner and thicker yarns available. If you substitute a thinner yarn like a sport weight--3 ply-- you'll end up with a smaller finished piece than what the pattern states. Like wise a thicker yarn will get you a larger finished piece, but I really don't recommend switching as not all patterns can tolerate the change and you may lose some of the details that attracted you to that pattern in the first place.

www.donnascrochetdesigns.com

April 02, 2007

Free Cabin Afghan Crochet Pattern


IN THE CABIN


Easy to make and fast. Time break down: Each block takes approximately 20 minutes to make. The required 42 blocks would average 10 1\2 hours. Then you needed 2 1\2 hours to sew the blocks into rows and the rows into the afghan. Finishing the afghan with the simple edging would again take about 2 1\2 hours, totaling the time invested to: 15 1\2 hours.

MATERIALS:
19 ozs. Red Heart 4-ply yarn in Claret, 18 ozs. Red Heart 4-ply yarn in Navy Fleck, needle to take yarn and J hook or hook needed to obtain gauge.

SIZE: 40" X 48"

Gauge: Motif is 6" X 6"

MOTIF:
ROW 1: With J hook and yarn, ch-20, sc 2nd ch from hook, sc across, turn. (19 sts)

ROW 2: Ch-3 (1st dc), (dc, ch-2, 2 dc) sa st as ch-3. * ch-1, sk 2 sts, keeping last lp on hook, 3 dc next st, yo and pull through all lps on hook (cluster st completed), ch-1, sk 2 sts, (2 dc, ch-2, 2 dc) next st (shell completed), rep from * 3 times, turn.

ROWS 3-9: Sl st to ch-2 sp, ch-3, (dc, ch-2, 2 dc) sa sp, * ch-1, cl around front post of next cl, ch-1, work a shell in next ch-2 sp, rep from * 3 times, turn. Fasten off at the end of row 9.

Make 21 blocks in Claret and 21 blocks in Navy Fleck.

With Navy Fleck yarn and needle sew the blocks tog in 7 rows of 6 blocks each alternating to get a checker board pattern. To emphasize the afghan’s texture, sew all Navy blocks turned on their side and the Claret blocks right side up.
Sew all seven rows tog to form the body of the afghan.

EDGING:
RND 1: With Claret yarn and J hook join in side of any block on afghan, ch-1, evenly sc around ea side and work (2 sc, ch-2, 2 sc) in each corner, sl st top beg sc, turn.

RND 2: Ch-3, dc in ea st around and work (2 dc, ch-2, 2 dc) in ea ch-2 lp, sl st top beg ch-3, turn.

RND 3: Rep rnd 2, fasten off.

RND 4: With Navy Fleck and J hook join in any st on edging, ch-3, dc ea st around working (2 dc, ch-2, 2 dc) in ea ch-2 lp, sl st top beg ch-3, turn.

RND 5: Rep rnd 2, fasten off.


Here is a close up of the blocks. I love the texture the stitches form and if you alternate the way you turn the blocks you can get a woven look to your afghan.

Enjoy!

www.donnascrochetdesigns.com


February 28, 2007

Magnets and Crochet

I love toys and I love to crochet, but I was unhappy with what you can do with them (toys) or maybe it would be better said that I was unhappy with what you can't do with a crochet toy. I've added wheels to make cars rollhttp://donnascrochetdesigns.com/page190.html (car) and http://donnascrochetdesigns.com/page202.html (wagon)--very elememtary stuff there--and I've done inside-outs. Inside-out toys are toys that are one thing, turn the entire piece inside out and they are another. http://donnascrochetdesigns.com/page193.html (hippo into a lion)and http://donnascrochetdesigns.com/page110.html (Easter egg into a bunny-one of a series). Now I'm incorporating magnets, but they have given me a bit of a problem.

I’ve tried several different brands of magnet and have found that the craft magnets found in most craft stores are not strong enough for this project. You need a magnet that can attract through two layers of crochet material and still stick to one another.

The best I’ve found is HM or House-Mates Hardware 3\4” disc magnets. I have found them at both Home Depot and Lowe’s in the screw\nut\bolt isle. Normally I resist giving such exact information as products change and businesses change what they carry, but in this insistence I think it’s best because what it easily found in most craft stores will not work in this project. You need a magnet that is strong enough to make that same magnet next to it flip to the correct pole (positive they come together, negative sides they repel) and stick together.

I hope this little bit of information has proved helpful. I know I for one can't wait for my next crochet\magnet project !

http://www.donnascrochetdesigns.com/

February 27, 2007

Ribbon Ring Belt Crochet Pattern


MATERIALS:

7- 10 yd reels of 1\8” wide Spool ‘O Ribbon in Light Blue, 9- 3” diameter brass rings, about 96- 6mm cracked glass beads in blue\pink, large eye beading needle, 1” split ring, 7\8” swivel hook, size H hook or hook to obtain gauge, needle and thread.

GAUGE: 6 sc = 1”, 5 rows sc = 1”, one reel of ribbon covers 2-1\2 rings

FINISHED SIZE: 3” wide X 40” long

RING:
RND 1: With ribbon and H hook work sc evenly around ring to cover, sl st top beg sc, fasten off.
-Make 9 (if you like to make the belt longer add more rings; shorter, remove rings.

JOINING RINGS:
ROW 1: With ribbon and H hook join in any st on covered ring, ch-1, sc sa st as ch-1, sc next 5 sts, leave remaining sts unworked, ch-1, turn. (6 sts)

ROW 2-6: Sc ea st across, ch-1, turn. End row 6 sl st to corresponding sts on next ring, fasten off.

NEXT RING:
ROW 1: With ribbon and H hook join in st next side of ring that is across from 1st st row 6 of previous join, ch-1, sc sa st as beg ch-1, sc next 5 sts, leave remaining sts unworked, ch-1, turn. (6 sts)

ROW 2-6: Sc ea st across, ch-1, turn. End row 6 sl st to corresponding sts on next ring, fasten off.

Rep next ring until all 9 rings are attached tog.

FRINGE:
With large eye beading needle thread beads onto a reel of ribbon. Knot one end of ribbon and slide four beads down. Measure down 10” and cut ribbon. Knot second end and slide 2 of the four beads to this knot. Make 9.

Knot one end of ribbon and slide four beads down. Measure down 6” and cut ribbon. Knot second end and slide 2 of the four beads to this knot. Make 18.

Place ribbon in center bottom sts of ea ring by inserting hook, fold ribbon in half, pull thought sts, insert free ends in this lp and pull tight. Ea ring gets 3 beaded tassels: 6”, 10” and 6”.

With needle and thread sew swivel hook to the end of belt centering it on ring. Decide where you want to fasten or close the belt and sew split ring here to wrong side of belt.


February 26, 2007

Free Crochet Pattern: Chenille Rose Purse


MATERIALS:
1 skein Lion Brand Thick and Quick chenille yarn in Periwinkle, K hook or hook to obtain gauge, needle and thread, small amount of cardboard, four 21” pieces of 26 gauge florist wire, 150 6mm crystal beads and 150 6mm pearl beads.

GAUGE: 2 sc = 1”, 2 rows = 1”

FINISHED SIZE: 5” X 8”

FLOWER:
Ch-3, sl st to from a ring.

RND 1: Ch-1, work 12 sc in ring, sl st top beg sc, do not turn.

RND 2: * (sc, hdc) next st, 3 dc next st, (hdc, sl st) next st, * rep bet ** 4 times, sl st top beg sc, do not turn.

RND 3: * Ch-3, sl st behind 2nd dc of 3 dc group worked rnd 2, ch-3, sl st behind next sc work rnd 2, * rep bet ** around, do not turn. (8 lps)

RND 4: Sl st to next lp, ch-1, (sc, hdc, 2 dc, hdc, sc) in ea lp around, sl st top beg sc, fasten off.

PURSE:
RND 1: With K and periwinkle ch-8, sc 2nd ch from hook, sc next 5 ch, 3 sc next ch, turn piece so you are now working across the bottom of foundation ch, sc next 6 ch, 2 sc last ch, sl st top beg sc, ch-1, turn. (18 sts)

RND 2: * 2 sc next st, sc next sc, 2 sc next st, sc next 6 sts, * rep bet ** twice, sl st top beg sc, ch-1, turn. (22 sts)

RND 3: 2 sc next st, sc next 7 sts, 2 sc next 4 sts, sc next 7 sts, 2 sc next 3 sts, sl st top beg sc, ch-1, turn. (30 sts)

RND 4-7: Sc ea st around, sl st top beg sc, ch-1, turn.

RND 8: (2 sc next st, sc next st) twice, 2 sc next st, sc next 9 sts, (2 sc next st, sc next st) twice, 2 sc next st, sc next 10 sts, sl st top beg sc, ch-1, turn. (36 sts)

RND 9-10: Sc ea st around, sl st top beg sc, ch-1, turn.

RND 11: * Sc next 10 sts, (2 sc next st, sc next st) 3 times, 2 sc next st, * rep bet ** twice, sl st top beg sc, ch-1, turn. (44 sts)

RND 12-15: Sc ea st around, sl st top beg sc, ch-1, turn. At the end of rnd 15 fasten off.

PURSE BOTTOM:
Rep rnd 1-3 of purse. Fasten off at the end of rnd 3.
Cut a piece of cardboard to fit piece. Turn purse inside out and with needle and thread sew wrong side bottom to wrong side of purse at the bottom inserting cardboard as you sew.

HANDLES:
Hold 2 of the 4 piece of wire tog and twist about 3”, then twist the 3” into an lp. On one wire thread 74 crystal beads. Thread 74 pearl beads on the other wire. Loosely twist the beaded wires tog all the way down to the wire’s ends. Twist remaining ends of the wire tog to form an lp. Rep with other wire and beads. Sew lps of handles to inside of purse with needle and thread.

February 14, 2007

Free Crochet Easter Egg Garland

EASTER EGG GARLAND


MATERIALS:


3py baby wt yarn in Aqua, Pink, Pastel blue, Lavender and Baby yellow, size E hook or hook to obtain gauge, Stuffing, 1” wide ribbon in 3’ length or as long as you’d like to make the garland, Craft glue and small 1\2” diameter white flowers.


Gauge: 6 sc = 1”, 6 rows sc = 1”, Egg is about 1-3\4” tall


BASIC EGG:


With yarn and E hook ch-3, sl st to form a ring.


RND 1: Ch-1, work 12 sc in ring, sl st top beg sc, ch-1, turn. (12 sts)


RND 2: (2 sc next st, sc next 2 sts) around, sl st top beg sc, ch-1, turn. (16 sts)


RND 3: (2 sc next st, sc next 3 sts) around, sl st top beg sc, ch-1, turn. (20 sts)


RND 4-6: Sc ea st around, sl st top beg sc, ch-1, turn.


RND 7: (Sk next st, sc next 9 sts) twice, sl st top beg sc, ch-1, turn. (18 sts)


RND 8: (Sk next st, sc next 8 sts) twice, sl st top beg sc, ch-1, turn. (16 sts)


RND 9: (Sk next st, sc next 7 sts) twice, sl st top beg sc, ch-1, turn. (14 sts)


RND 10: Sc ea st around, sl st top beg sc, ch-1, turn.


RND 11: (Sk next st, sc next 6 sts) twice, sl st top beg sc, ch-1, turn. (12 sts) Stuff egg.


RND 12: (Sk next st, sc next 5 sts) twice, sl st top beg sc, ch-1, turn. (10 sts)


RND 13: Sc next st, (sk next st, sc next st) 4 times, sc last st, sl st top beg sc, ch-1, turn. (6 sts)


RND 14: (Sk next st sc next st) around, sl st top beg sc, fasten off. (3 sts)


Make as many eggs as you like. Glue onto ribbon at about 2 to 2-1\2” intervals. Add the flowers. If you like, make a loop at ea end for hanging.

The eggs also work well on a wreath or in a flower arrangement.

http://www.donnascrochetdesigns.com

February 12, 2007

Donna's Crochet Designs the Website


Get use to seeing this guy!


Introducing Shelby's Monkey, the mascot of my new website Donna's Crochet Designs.


http://www.donnascrochetdesigns.com


All patterns are of my own design, converted to a PDF so they can be e-mailed direct to you.


No Shipping Charges!


No Handling Charges! Best of all no long waits for your pattern to arrive!

Here is a picture of the completed Monkey. He has toes and "thumbs" as well as a nice long tail. The design sample was made using Red Heart Baby Clouds yarn so he is extra soft and cuddly. The pattern is a great buy at 2.99!

Come take a look you may find something you'd like.

Most of my patterns are .99-1.99 in price.

http://www.donnascrochetdesigns.com


January 26, 2007

Easter Egg Rug Crochet Pattern


EASTER EGG RUG


MATERIALS:
1 skein each color Bernat Baby Coordinates yarn; Soft Mauve, Soft Blue, Baby Pink and Lemon Custard, K hook or hook needed to obtain gauge, six 1\2” flower patches\appliqués, three 1\2” baby chicks patches\appliqués and no sew glue.


Gauge: 6 sc, dc sts = 2”, 4 rows sc, dc sts = 2”, 3 hdc = 1”, 2 rows of hdc = 1”


FINISHED SIZE: 24” X 25”


EGG:
Worked with two strands of yarn throughout.
ROW 1: With 2 strands custard and K hook ch-13, sc 2nd ch from hook, (dc next ch, sc next ch) 5 times, dc last ch, ch-1, turn. (12 sts)


ROW 2: (Sc, dc) next 2 sts, (sc next dc, dc next sc) across to last 2 sts, (sc, dc) next 2 sts, ch-1, turn. (16 sts)


ROW 3: (Sc next dc, dc next sc) across, fasten off custard; join blue, ch-1, turn.


ROW 4: Rep row 2. (20 sts)


ROW 5: (Sc next dc, dc next sc) across, ch-1, turn.


ROW 6: Rep row 2. (24 sts)


ROW 7: Rep row 5. At the end of row seven fasten off blue, join custard.


ROW 8: Rep row 5.


ROW 9: Rep row 2. At the end of row 9 fasten off custard, join pink. (28 sts)


ROW 10-11: Rep row 5.


ROW 12: Rep row 2. (32 sts)


ROW 13: Rep row 5. At the end of row 13 fasten off pink, join custard.


ROW 14: Rep row 5.


ROW 15: Rep row 2. At the end of row 15 fasten off custard, join mauve, (36 sts)


ROW 16-18: Rep row 5.


ROW 19: Dc dec next 2 sts, (sc next dc, dc next sc) across, ch-1, turn. (35 sts)


ROW 20: Dc dec next 2 sts, (sc next dc, dc next sc) to last 3 sts, sc next st, dc dec next 2 sts, fasten off mauve, join custard, ch-1, turn. (33 sts)


ROW 21: Dc dec next 2 sts, (sc next dc, dc next sc) to last 3 sts, sc next st, dc dec next 2 sts, ch-1, turn. (31 sts)


ROW 22: Rep row 21. End row 22 fasten off custard; join pink. (29 sts)


ROW 23-25: Rep row 21. End row 25 fasten off pink; join custard. (27 sts)(25 sts)(23 sts)


ROW 26-27: Rep row 21. End row 27 fasten off custard; join blue. (21 sts)(19 sts)


ROW 28-30: Rep row 21. End row 30 fasten off blue; join custard. (17 sts)(15 sts)(13 sts)


ROW 31-33: Rep row 21. end row 33 do not turn, do not fasten off. (11 sts)(9 sts)(7 sts)


EDGING:
Please note: When working the edging always carry yarn you are not working with behind the stitches you are currently working. After the first rnd the instructions will no longer included drop yellow, pick up blue due to its length. You are still using two strands of yarn.


RND 1: Evenly hdc around outer edge of egg, sl st top beg hdc, ch-1, turn. (111 sts)


RND 2: Hdc 1st st, join blue, drop custard, * hdc next st, drop blue, pick up custard, hdc sa st, (drop custard, pick up blue, hdc next st, drop blue, pick up custard, hdc next st) 4 times, drop custard, pick up blue, hdc next st, drop blue, pick up custard, hdc next st, drop custard, pick up blue hdc sa st, (drop blue, pick up custard, hdc next st, drop custard, pick up blue, hdc next st) 4 times, drop blue, pick up custard, hdc next st, * rep bet ** around, sl st top beg hdc, ch-1, turn. (122 sts)


RND 3: Custard hdc next st, blue hdc next, * custard hdc next, blue hdc sa st, (custard hdc next, blue hdc next) 5 times, custard hdc next, blue hdc next, custard hdc sa st, (blue hdc next, custard hdc next) 5 times, blue hdc next, * rep bet ** around, sl st top beg hdc, ch-1, turn. (134 sts)


RND 4: (Blue hdc next st, custard hdc next st) twice, * Blue hdc next st, custard hdc sa st, rep bet () 6 times, * rep bet ** around, sl st top beg hdc, ch-1, turn. (144 sts)


RND 5: (Blue hdc next st, custard hdc next st) twice, * blue hdc next st, custard hdc sa st, rep bet () 6 times, blue hdc next st, custard hdc next st, blue hdc sa st, (custard hdc next, blue hdc next) 6 times, custard hdc next, * rep bet ** around, sl st top beg hdc, ch-1, turn. (154 sts)


RND 6: (Blue hdc next st, custard hdc next st) around, join pink, sl st top beg hdc, ch-1, turn, fasten off blue.


RND 7: (Pink hdc next st, custard hdc next st) twice, * pink hdc next st, custard hdc sa st, rep bet () 7 times, * rep bet ** around, sl st top beg hdc, ch-1, turn. (164 sts)


RND 8: (Pink hdc next st, custard hdc next st) twice, pink hdc next st, custard hdc sa st, rep bet () 7 times, pink hdc next, custard hdc next st, pink hdc sa st, (custard hdc next, pink hdc next) 7 times, custard hdc next, * rep bet ** around, sl st top beg hdc, ch-1, turn. (174 sts)


RND 9: (Pink hdc next st, custard hdc next st) twice, * pink hdc next st, custard hdc sa st, rep bet () 8 times, * rep bet ** around, sl st top beg hdc, ch-1, turn. (184 sts)


RND 10: (Pink hdc next st, custard hdc next st) twice, * pink hdc next st, custard hdc sa st, () 8 times, pink hdc next, custard hdc next, pink hdc sa st, (custard hdc next, pink hdc next) 8 times, custard hdc, * rep bet ** around, sl st top beg hdc, ch-1, turn. 194 sts)


RND 11: (Pink hdc next st, custard hdc next st) around, join mauve, sl st top beg hdc, ch-1, turn, fasten off pink.


RND 12: (Mauve hdc next st, custard hdc next st) twice, * mauve hdc next st, custard hdc sa st, rep bet () 9 times, * rep bet ** around, sl st top beg hdc, ch-1, turn. (204 sts)


RND 13: (Custard hdc next st, mauve hdc next st) twice, * custard hdc next, mauve hdc sa st, rep bet () 9 times, custard hdc next, mauve hdc next st, custard hdc sa st, (mauve hdc next, custard hdc next) 9 times, mauve hdc next, * rep bet ** around, sl st top beg hdc, ch-1, turn. (214 sts)


RND 14: (Mauve hdc next st, custard hdc next st) twice, * mauve hdc next, custard hdc sa st, rep bet () 10 times, * rep bet ** around, sl st top beg hdc, ch-1, turn. (224 sts)


RND 15: (Custard hdc next st, mauve hdc next st) twice, * custard hdc next, mauve hdc sa st, rep bet() 10 times, custard hdc next, mauve hdc next, custard hdc sa st, (mauve hdc next, custard hdc next) 10 times, mauve hdc next, * rep bet ** around, sl st top beg hdc, ch-1, turn. (234 sts)


RND 16: (Mauve hdc next st, custard hdc next st) around, sl st top beg hdc, fasten off all yarns.


FINISHING:
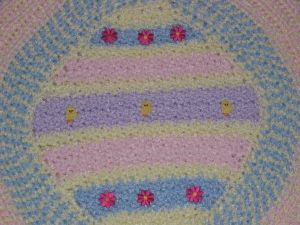
With no sew glue, glue flowers across the blue stripes in the egg and the chicks across the mauve stripe.
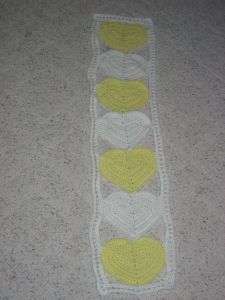
Heart Table Runner Crochet Pattern


YELLOW & WHITE HEARTS TABLE RUNNER

MATERIALS:
4 ply Red Heart yarn in: Yellow and White, needle to take yarn, and H hook or hook needed to obtain gauge.

FINISHED SIZE: 9” X 41”

Gauge: 4 hdc = 1”, 2 rows hdc = 1”

HEART:
RND 1: With White and H hook ch-13, hdc 2nd ch from hook, hdc next 5 ch, sk 1 ch, hdc next 5 ch, turn piece so you are now working across the bottom of the foundation row, hdc next 5 ch, (hdc, ch1, hdc) next ch, hdc last 5, sl st top beg hdc, ch-1, turn. (22 sts)

RND 2: 2 hdc next 2 sts, hdc across to ch-1 sp, (hdc, ch-1, hdc) sa sp, hdc next 4 sts, 2 hdc next 3 sts, hdc next 3 sts, hdc dec next 2 sts, hdc next 3 sts, 2 hdc next st, sl st top beg hdc, ch-1, turn. (30 sts)

RND 3: 2 hdc next 2 sts, hdc next 3 sts, hdc dec next 2 sts, hdc next 4 sts, 2 hdc next 4 sts, hdc ea st to ch-1 sp, (hdc, ch-1, hdc) ch-1 sp, hdc next 7 sts, 2 hdc next 2 sts, sl st top beg hdc, ch-1, turn. (39 sts)

RND 4: 2 hdc next 3 sts, hdc ea st to ch-1 sp, (hdc, ch-1, hdc) in ch-1 sp, hdc next 10 sts, 2 hdc next 5 sts, hdc next 4 sts, hdc dec next 2 sts, hdc next 3 sts, 2 hdc next 2 sts, sl st top beg hdc, ch-1, turn. (51 sts)

RND 5: (2 hdc next st, hdc next st) 3 times, hdc next 2 sts, hdc dec next 2 sts, hdc next 3 sts, rep bet ()6 times, hdc ea st to ch-1 sp, (dc ch-1, dc) in ch-1 sp, hdc next 10 sts, rep bet ()3 times, sl st top beg hdc, ch-1, turn. (62 sts)

RND 6: Hdc ea st to ch-1 sp, (dc, ch-1, dc) in ch-1 sp, hdc next 30 sts, sl st next 3 sts, hdc remaining sts, sl st top beg hdc, fasten off. (63 sts)

-Make 3 white hearts and 4 yellow hearts. With needle and yarn tack the hearts tog at the dip in ea heart and pt of other heart.

RUNNER EDGING EDGING:
RND 1: With rt side of place mat facing you and white yarn join pt of bottom heart, ch-1, sc sa st, ch-8, sk 7 sts trc next st, ch-1, trc sa st, ch-8, sk 5 sts, sc next 7 sts, (ch-14, sk 13 sts from pt of next heart in row, sc next st 8 sts) 6 times, ch-3, sk 2 sts, dc next st, ch-1, dc sa st, ch-3, sk 2 sts, sc next 4 sts, ch-6, sk 6 sts, sc next 4 sts, ch-3, sk 2 sts, dc next st, ch-1, dc sa st, ch-3, sk 2 sts, sc next 8 sts, (ch-14, sk 11 sts from heart center next heart in row, sc next 8 sts) 6 times, ch-8, sk 5 sts, trc next st, ch-1, trc sa st, ch-8, sl st top beg sc, ch-1, turn.

RND 2: Sc in ea st and ch around working (2 sc, ch-1, 2sc) in ea corner ch-1 sp, sl st top beg sc, ch-1, turn. (345 sts)

RND 3: Ch-4, (sk next st, dc next st, ch-1) around working (dc, ch-1, dc, ch-1) in ea corner ch-1 sp, end with sl st in 3rd ch of beg ch-4, ch-1, turn.

RND 4: rep rnd 2, fasten off. (357 sts)

Heart Place Mat Crochet Pattern


YELLOW & WHITE HEARTS PLACE MAT

MATERIALS:
4 ply Red Heart yarn in: Yellow and White, needle to take yarn, and H hook or hook needed to obtain gauge.

FINISHED SIZE: 12” X 15-1\2”

Gauge: 4 hdc = 1”, 2 rows hdc = 1”

HEART:
RND 1: With White and H hook ch-13, hdc 2nd ch from hook, hdc next 5 ch, sk 1 ch, hdc next 5 ch, turn piece so you are now working across the bottom of the foundation row, hdc next 5 ch, (hdc, ch1, hdc) next ch, hdc last 5, sl st top beg hdc, ch-1, turn. (22 sts)

RND 2: 2 hdc next 2 sts, hdc across to ch-1 sp, (hdc, ch-1, hdc) sa sp, hdc next 4 sts, 2 hdc next 3 sts, hdc next 3 sts, hdc dec next 2 sts, hdc next 3 sts, 2 hdc next st, sl st top beg hdc, ch-1, turn. (30 sts)

RND 3: 2 hdc next 2 sts, hdc next 3 sts, sl st next 3 sts, hdc next 3 sts, 2 hdc next 4 sts, hdc ea st to ch-1 sp, (hdc, ch-1, hdc) ch-1 sp, hdc next 7 sts, 2 hdc next 2 sts, sl st top beg hdc, fasten off. (39 sts)

-Make 3 white hearts and 6 yellow hearts. With needle and yarn tack the hearts tog at the sides in three rows of three sa color hearts. Now tack the rows tog at the dip in ea heart and pt of other heart.

PLACE MAT EDGING:
RND 1: With rt side of place mat facing you and white yarn join 7th st from center of white heart (this would be on the side of the heart), ch-1, sc sa st as ch-1, sc next 3 sts, ch-8, sc in 7th st from center of next heart next row, sc next 3 sts, ch-6, sk 2 sts, trc next st, ch-1, trc sa st, ch-8, sc in pt of sa heart, (ch-18, sc next pt) twice, ch-8, sk 6 sts, trc next st, ch-1, trc sa st, ch-6, sk 2 sts, sc next 4 sts, (ch-8, sc 10th st from center pt of next heart, sc next 3 sts) twice, ch-3, sk next 2 sts, dc next st, ch-1, dc sa st, ch-3, sk 2 sts, sc next 4 sts, ch-8, sl st top beg sc, ch-1, turn.

RND 2: Sc in ea st and ch around working (2 sc, ch-1, 2sc) in ea corner ch-1 sp, sl st top beg sc, ch-1, turn. (191 sts)

RND 3: Ch-4, (sk next st, dc next st, ch-1) around working (dc, ch-1, dc, ch-1) in ea corner ch-1 sp, end with sl st in 3rd ch of beg ch-4, ch-1, turn.

RND 4: rep rnd 2, fasten off. (222 sts)

Dresser Scarf Crochet Pattern


FLOWER AND LACE DRESSER SCARF

MATERIALS NEEDED:
8 1.75 oz balls White Luster Sheen yarn, size F hook or hook to obtain gauge.

SIZE: 8 1\2" X 68” (8 blocks)

Gauge: Block = 8 1\2” X 8 1\2”

BLOCK:
ROW 1: With white and F hook ch-42, sc 2nd ch from hook, hdc next ch, * [sk next 3 ch, work (3 dc, ch-1, 3 dc) in next ch, sk 3 ch, hdc next ch], ch-1, sk 1 ch, hdc next ch, * rep bet ** 3 times, rep bet [] once, sc last ch, turn. (34 sts)

ROW 2: Ch-2 (counts as 1st sc), sc in 1st st, * [ ch-3, hdc into ch-1 sp, ch-3,] work (sc, ch-1, sc) in next ch-1 sp,* rep bet ** 3 times, rep bet [] once, 2 sc last st, turn.

ROW 3: Ch-3 (counts as 1st dc), 3 dc 1st st, * [hdc in next ch-3 sp, ch-1, hdc next ch-3 sp,] (3 dc, ch-1, 3 dc) in ch-1 sp, * rep bet ** 3 times, rep bet [] once, 4 dc in top ch-2 of previous row, turn.

ROW 4: Ch-1, hdc 1st st, * Ch-3, (sc, ch-1, sc) next sp, ch-3, hdc next ch-1 sp, rep from * ending with last hdc in top ch-3 of previous row, turn.

ROW 5: Ch-1, hdc 1st st, * [hdc next ch-3 sp, (3 dc, ch-1, 3 dc) next ch-1 sp, hdc next ch-3 sp,] ch-1 * rep bet ** 3 times, rep bet [] once, hdc in last st, turn.

ROW 6-21: Rep rows 2-5 in sequence. At the end of row 21, do not turn or fasten off.
Please note: from now on you are working in rnds, not rows.

RND 22: Ch-1, evenly sc in ea st and row around piece and working 2 sc in ea corners so that a count of 27 sts is on ea side, ch-1, do not turn.

RND 23: Ch-1, (sc, ch-3, sc) next st, * [ch-9, sk 5 sts, sc in next st, ch-3, sc next st, * rep bet ** twice, ch-9, sk 5 sts, (sc, ch-3, sc) next st (corner)], rep bet [] 3 times, rep bet ** once, ch-9, sk 5 sts, sl st top beg sc, turn.

RND 24: Sl st to next ch-9 sp, * ch-1, work (5 dc, ch-2, sc, ch-2, 5 dc) in ch-9 sp, sc in next ch-3 sp, rep from * around, sl st top beg dc, turn.

RND 25: Sl st next 6 sts, sl st next ch-2 sp, ch-1, * sc in ch-2 sp, ch-2, sc next ch-2 sp, ch-9, rep from * around ending with ch-9, sl st top beg sc, turn.

RND 26: Sl st next ch-9 sp, ch-1, * (5 dc, sc, 5 dc) in ch-9 sp, sc next ch-3 sp, rep from * around, sl st top beg dc, fasten off.

JOINING RND-RND 26: work as established in rnd 26: [5 dc in ch-9 sp, sl st in corresponding sc of 2nd block, sc in 1st block’s ch-9 sp, 5 dc in sa sp] rep bet [] 5 times to join blocks, then return to rnd 26 instructions.

Make 8 blocks (or number you need for your dresser) joining as you work.
Wet and block runner to get edges to lay flat.

FLOWER: With white yarn and F hook, ch-4, sl st to form a ring.

RND 1: Ch-1, work 15 sc in ring, sl st in beg ch-1.

RND 2: Working in the front lp of rnd 1’s sts, * ch-2, sc next st, rep from * around ending with ch-2, sl st bottom beg ch-2.

RND 3: Ch-2, sl st to back lp next st of rnd 1. You are working this rnd in rnd 1’s back lps. Ch-1, work 2 sc in ea st around, sl st bottom beg ch-1.

RND 4: Working in front lps of sts, sl st next front lp, ch-3 (counts as 1st dc), * hdc next st, sc next st, hdc next st, (dc, trc, dc) next st, * rep bet ** 6 times, hdc next st, sc next st, hdc next st, (dc, trc) in sa st as beg ch-3, sl st top beg ch-3.

RND 5: Working in back lps of rnd 3’s sts, ch-3, sl st next back lp, Ch-3 (counts as 1st dc), * hdc next st, sc next st, hdc next st, (dc, trc, dc) next st, * rep bet ** 6 times, hdc next st, sc next st, hdc next st, (trc, dc) sa st as beg ch-3, sl st top beg ch-3, fasten off.

Make a total of 12 flowers. Sew flowers in groups of three, alternating sides and blocks on runner.

Cute Trim For Jumper Crochet Pattern


TOUCH OF LACE


MATERIALS NEEDED:
Size 18 month jumper, Jamie brand baby yarn in white, F hook or hook to obtain gauge, 1\4” wide ribbon about 34” long (color of your choice), needle and thread.


GAUGE: 1 3\4” wide and 32” long. You can wide by rep row 3 & 4 and then continuing with pattern. Or you can make longer adding in multiples of 5 (ch).


LACE:
ROW 1: With yarn and F hook ch-182, sc 2nd ch from hook, sc ea ch across, ch-1, turn. (181 sts)


ROW 2: * Sc next st, ch-5, sk 4 sts, * rep bet ** across, ending with sc last st, ch-1, turn.


ROW 3: * Dc next st, ch-5, * rep bet ** across, ending with dc in last st, ch-1, turn.


ROW 4: * Sc next st, ch-5, * rep bet ** across, ending with sc in last st, ch-1, turn.


ROW 5: * Sc next st, (6 trc next st), * rep bet ** across, ending with sc last st, fasten off.
Weave ribbon over and under dc in row 3. With needle and matching thread, tack ribbon on sts that don’t show to hold in place.


Sew across bottom of jumper.

Granny Square Inserts for Your Shirt Crochet Pattern


ADDING GRANNY SQUARES TO A SHIRT

MATERIALS: Purchased white knit shirt, size 10 thread in white, maize and mint greed, size 7 hook or hook to obtain gauge, sharp pair of scissors, needle to take crochet thread and either a sewing machine or needle and thread.

(In my example I used a size Large Juniors shirt, 150 yds of maize and mint green thread and 250 yds of white thread.)

Gauge: 1 sq. = 2 1\2”

BLOCK:
With color A and 7 hook ch-6 sl st to form a ring.

RND 1: Ch-3, work 15 dc in ring, sl st top beg ch-3, do not turn.

RND 2: Ch-5, * (dc, ch-2) next st * rep ** around, sl st 3rd ch of beg ch-5, do not turn.

RND 3: Sl st next ch-2 sp, ch-3, 2 dc sa sp as ch-3, * ch-1, 3 dc next sp * rep bet around, ch-1, sl st top beg ch-3, do not turn.

RND 4: Sl st next 2 sts, sc next ch-1 sp, * ch-6, sc next ch-1 sp, (ch-3, sc next ch-1 sp) 3 times, * rep bet ** around ending with ch-3, sl st top beg sc, fasten off.

RND 5: Join white thread in any ch-6 sp, ch-3, (4 dc, ch-2, 5 dc) sa sp, * 3 dc next 3 sps, (5 dc, ch-2, 5 dc) next ch-6 sp, * rep bet ** 3 times, 3dc next 3 sps, sl st top beg ch-3, fasten off.

Alternating between mint ant maze center circles, make enough blocks to make two rows that fit around the waist of your purchased shirt. Sew them tog first in rows and then as one piece. Pin to shirt (right side shirt to wrong side design) and sew along the top and bottom of crochet piece. Carefully cut away the back of the shirt.

Rep for both sleeve bands.

Please note: if you happen to end up with two of the same color blocks tog after sewing the rows end to end, simply place them at a side or under arm seam to be less noticeable.

Flower Fairy Plant Pick Crochet Pattern


FLOWER PICK FAIRY


MATERIALS NEEDED:
Small amounts of baby wt yarns in Baby Yellow and Baby Yellow Print (Jamie Brand), size E hook or hook to obtain gauge, 38 mm porcelain doll head and hands, needle and yellow sewing thread, craft glue and 12” wooden skewer.


Gauge: 6 sc = 1", 6 rows = 1".


DRESS:
RND 1: With Baby Yellow yarn and E hook ch-16, sl st to form a ring, ch-1, sc in ea ch around, sl st top beg sc, ch-1, turn. (16 sts)


RND 2-16: Sc ea st around, sl st top beg sc, ch-1, turn. At the end of rnd 16 fasten off.
Glue dress around the shoulders of the porcelain doll’s head.


ARMS (MAKE TWO):
With Baby Yellow yarn and E hook ch-3, sl st to form a ring.


RND 1: Ch-1, work 8 sc in ring, sl st top beg sc, ch-1, turn. (8 sts)


RND 2-6: Sc ea st around, sl st top beg sc, ch-1, turn.


RND 7: (Sc next st, sk next st) around, sl st top beg sc, ch-1, turn. (4 sts)


RND 8: (Ch-3, sl st next st) around, fasten off.


Slide hands into bottom of ea sleeve (rnd 8). Fold top of sleeves flat and glue to ea side of doll at shoulders.


LARGE PETAL:
ROW 1: With Baby Yellow Print yarn and E hook ch-3, sc 2nd ch from hook, sc next ch, ch-1, turn. (2 sts)


ROW 2: Sc ea st across, ch-1, turn.


ROW 3: (Sc, hdc, dc) next st, (dc, hdc, sc) next st, fasten off. (6 sts)


-Make 18 of these.


With needle and thread sew lg petals in 3 rows of 6 petals ea to bottom of dress, over lapping edges.


SMALL PETAL:
ROW 1: With Baby Yellow Print and E hook ch-3, (sc, hdc, dc) 2nd ch from hook, (dc, hdc, sc) last ch, fasten off. (6 sts)


-Make 11 small petals.


Sew 6 of these petals over the top of the lg petal row on skirt. Sew the remaining small petals around the neck edge of dress\doll.


WINGS:
ROW 1: With Baby Yellow Print and E hook ch-6, sc 2nd ch from hook, sc next 2 ch, (hdc, dc) next ch, 2 dc next ch, turn piece so you are now working across the bottom of the foundation ch, (dc, hdc) next ch, sc next 3 ch, ch-1, turn. (9 sts)


ROW 2: Sc next 3 sts, hdc next 2, 3 dc next 2, hdc next 2, sc last 3, ch-1, turn. (16 sts)


ROW 3: Sl st next 3 sts, sc next, hdc next, 2 dc next 6, hdc next, sc next, sl st last 3 sts, fasten off. (22 sts including sl sts)


-Make 2.


Sew wings to the back of the doll.


Glue skewer inside doll’s body and head making certain skewer reaches completely into head. Let dry. Place your flower fairy in any flower arrangement or plant as a special touch.