Showing posts with label Belt. Show all posts

April 18, 2012

Free Vintage Pattern Set Called Teenage Miss

One of this week's free vintage patterns is actually a booklet with 9 projects. 
 They are all  crochet and the booklet is called Teenage Miss
I guess they were designs with a teen in mind, funny notion now with how old the look is!

Teenage Miss cover showing a hat & bag set as well as a cap


They call it a Bandeau but it looks like a headband to me!


Cap, Belt & Pocket Set

July 14, 2011

Missy Kissy Slinky Stair Walking Toy


Missy Kissy: I've no real reason for naming this creation Missy Kissy. It's just that the lips are in the shape of a heart which make me think of puckering up for a kiss and with the wiggle eyes and ring on her feet...well, it just has to me a miss and not a Mr doesn't it?

Anyway, as you can see I took a jumbo plastic Slinky and crochet around it with fun fur eyelash yarn. It's not as hard as it sounds. Once you get started it goes fairly fast.

I only used one skein of yarn and then stretched it out to cover as much of the Slinky as possible and removed the remaining Slinky spring. I was able to cut it with scissors, but don't use your best pair!

Next I added felt feet, eyes and mouth and even a ring for one of her toes!

Wiggle eyes made the look complete. There is a slit from the bottom of the eyes to about the wiggle eye. When split apart it is glued to either side of a spring.

And you are done.

Best of all, if you stretched your yarn out enough and only ended up clipping off a few of the springs it will still walk down the stairs much like a Slinky of old, but funnier!

I made two, this jumbo one and a smaller one. You can find the pattern on my site along with the patterns for the felt.

Oh yea, about what I did with the left over springs.

Now you know I couldn't leave them alone, right?

I made this belt. It reminds me of a 1960's brass ring belt. I cut the rings apart so that I had continuous circles and then crochet the connectors.

Each connector was then sewn around a ring until I had enough for a belt.

I haven't had the nerve to wear it though!


www.donnascrochetdesigns.com
www.freepatternsdonnascrochetdesigns.com
www.livingplastic.com


December 06, 2007

Free Crochet Pattern Suede Yarn 2 piece Belt Interwoven

Free Crochet Pattern Suede Yarn
Two-Piece Interwoven Belt

MATERIALS:

2 skeins Lion Suede yarn in Ecru, H hooks or hook to obtain gauge, 2 D rings, needle and thread.

GAUGE: 3 hdc = 1”, 2 rows hdc = 1”

FINISHED SIZE: 2-3\4” X 46”

BELT:

RND 1: With Ecru and H hook ch-16, sl st to form a ring, ch-1, (Hdc next ch, 2 hdc next ch) around, sl st top beg hdc, ch-1, turn. (24 sts)

ROW 2: Hdc next 6 sts, leave remaining sts unworked, ch-1, turn. (6 sts)

ROW 3-6: Hdc ea st across, ch-1, turn.

RND 7: Ch-12, sl st to side st of row 6 to form a lp, ch-1, (hdc next ch, 2 hdc next ch) across ch, sl st in side of last st in row 6, ch-1, turn. (18 sts in chs)

ROW 8: Sl st next 6 sts, ch-1, hdc next 6 sts, leave remaining sts unworked, ch-1, turn.

ROW 9-12: Hdc ea st across, ch-1, turn.

Rep rnd 7 and row 8-12 10 more times.

Rep rnd 7.

Next row, sl st next 8 sts, ch-1, hdc next 2 sts, ch-1, turn.

Hdc ea st across for 11 more rows and fasten off.

Rep entire instructions again for the second one only Hdc ea st across for 5 more rows and fasten off.

PUTTING IT TOGETHER:

Lay one section flat onto a table, doesn’t matter which one. The first ring made (rnd 1) is the top of the piece with the end with rows of 2 hdc as the bottom. Beg with the top of the piece (one on the table) and weave over and under the circular openings with the second piece beg with its bottom, to the end. Sew the 2 D rings to the shorter bottom end and use the longer to fasten the belt with.

This is another belt that is easy to make longer or shorter because it is based on a repeat motif.

http://www.donnascrochetdesigns.com/

http://www.freepatternsdonnascrochetdesigns.com/


December 05, 2007

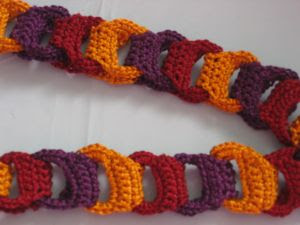
Free Crochet Pattern Small Interlocking Pieces Bele


Free Crochet Pattern Small Interlocking Pieces Belt

MATERIALS:


2 (27 yd) skeins DMC Pearl Cotton in Burgundy 814, Gold 976 and Purple 550, size O hook, one swim suit bra hook, needle and invisible thread(optional).


GAUGE: Ea piece is 2-1\2” long- you can get 7-1\2 from one skein


FINISHED SIZE: 1” wide X 36”


BASIC PIECE:
With DMC and O hook ch-12, sl st to form a ring.


RND 1: ch-1, work 24 sc in ring, sl st top beg sc, ch-1, turn. (24 sts)


ROW 2: Sc next 8 sts, leave remaining sts unworked, ch-1, turn. (8 sts)


ROW 3: Sk next st, sc next 6 sts, sl st last st, ch-1, turn. (6 sts)


ROW 4: Sk sl st and next st, sc next 4 sts, sl st last st, ch-1, turn. (4 sts)


ROW 5-7: Sc ea st across, ch-1, turn.


ROW 8-9: 2 sc 1st st, sc across to last st, 2 sc last st, ch-1, turn. (6 sts)(8 sts)


RND 10: Ch-8, sl st in 1st st row 9, ch-1, work 16 sc in ring, sl st in side last st row 9, fasten off.


-Make 15 of ea color.


PUTTING IT TOGETHER:


Beginning with a burgundy piece slip the swimsuit bra hook (solid section) over the crochet piece pulling it to the center. Fold piece in half. If you like, you can tack the top closed. Slide gold crochet piece through the doubled holes of previous piece. Fold in half and tack closed. Rep with remaining pieces alternating colors. It is important to sew the top of the last piece closed and slide this over the open loop of the swimsuit bra hook.


It's simple and easy to adjust the belt's lenght. It you want to make it larger, just add more pieces. Smaller: use fewer pieces.
Using DMC Pearl Cotton you can get a wider varity of colors and it is softer to the touch than size 10 crochet thread, but just as easy to work with.


February 27, 2007

Ribbon Ring Belt Crochet Pattern


MATERIALS:

7- 10 yd reels of 1\8” wide Spool ‘O Ribbon in Light Blue, 9- 3” diameter brass rings, about 96- 6mm cracked glass beads in blue\pink, large eye beading needle, 1” split ring, 7\8” swivel hook, size H hook or hook to obtain gauge, needle and thread.

GAUGE: 6 sc = 1”, 5 rows sc = 1”, one reel of ribbon covers 2-1\2 rings

FINISHED SIZE: 3” wide X 40” long

RING:
RND 1: With ribbon and H hook work sc evenly around ring to cover, sl st top beg sc, fasten off.
-Make 9 (if you like to make the belt longer add more rings; shorter, remove rings.

JOINING RINGS:
ROW 1: With ribbon and H hook join in any st on covered ring, ch-1, sc sa st as ch-1, sc next 5 sts, leave remaining sts unworked, ch-1, turn. (6 sts)

ROW 2-6: Sc ea st across, ch-1, turn. End row 6 sl st to corresponding sts on next ring, fasten off.

NEXT RING:
ROW 1: With ribbon and H hook join in st next side of ring that is across from 1st st row 6 of previous join, ch-1, sc sa st as beg ch-1, sc next 5 sts, leave remaining sts unworked, ch-1, turn. (6 sts)

ROW 2-6: Sc ea st across, ch-1, turn. End row 6 sl st to corresponding sts on next ring, fasten off.

Rep next ring until all 9 rings are attached tog.

FRINGE:
With large eye beading needle thread beads onto a reel of ribbon. Knot one end of ribbon and slide four beads down. Measure down 10” and cut ribbon. Knot second end and slide 2 of the four beads to this knot. Make 9.

Knot one end of ribbon and slide four beads down. Measure down 6” and cut ribbon. Knot second end and slide 2 of the four beads to this knot. Make 18.

Place ribbon in center bottom sts of ea ring by inserting hook, fold ribbon in half, pull thought sts, insert free ends in this lp and pull tight. Ea ring gets 3 beaded tassels: 6”, 10” and 6”.

With needle and thread sew swivel hook to the end of belt centering it on ring. Decide where you want to fasten or close the belt and sew split ring here to wrong side of belt.