Showing posts with label ornament. Show all posts

December 07, 2012

Some Of My Favrite Snowmen From Years Pass

This is a Tassel Snowman Ornament.  What I really like about this guy is how easy he is to make.  You just make a hollow snowman and then stuff the tassel in to give him a great wispy look.


Ahhh, Dance Of The Snow People.  I think I'm more in love with the idea that after everyone has gone to bed the all snow people made that wintry day dress up and go to a midnight ball.

Peppermint Snowman At Top A Peppermint Pillow.  He makes a great stand alone decoration.

But my all time favorite has to be these Snowman Faces.  They are so versatile, you'd never get bored playing with these guys!
Enjoy!

November 14, 2012

Free Crochet Ornament and Rug Pattern

 Here are two new free patterns just in time for your Christmas decorating.  The first one is for the tree.  The ornament was made using size 10 crochet threads and features an indented center like ornaments from holidays past. It measures 3-1/2" across and filled with stuffing or fiber fill. 
Make one in a dozen different colors to decorate your tree!
Make them as gifts!
Add them to the bow on a present!

The second pattern is also an ornament but this one was made for the floor!  It's an ornament rug!
The rug features a two-color center that "swirls". It was made using 2 strands of worsted weight yarn and is 24" across.

I hope you enjoy them!
www.donnascrochetdesigns.com
www.freepatternsdonnascrochetdesigns.com

October 31, 2011

Now on All Free Holiday Crafts

All Free Holiday Crafts
Is this great site for everything holiday and the crafts are all free!
I don't know about you, but I love it when its free!
I just found out they have one of my crochet patterns there.
It's Peppermint Candy Ornaments.
Very fast and east project to crochet!
Check It Out!
You may find your next project there!

December 16, 2008

Ribbon Candy Garland Free Crochet Pattern


RIBBON & PEPPERMINT CANDY GARLAND FREE CROCHET PATTERN

MATERIALS:

Red Heart TLC Amore yarn in White and Red Velvet, size H hook or hook to obtain gauge, needle and invisible (clear) sewing thread.

Gauge: 4 sc = 1”, 4 rows sc = 1”


PEPERMINT CANDY (1” DIAMETER):


Carry unused yarns behind sts as you work.

With white yarn and H hook ch-4, sl st to form a ring.

RND 1: Ch-1, sc in ring, join red, drop white, sc in ring, (drop red, pick up white, sc in ring, drop white, pick up red, sc in ring) 3 times, sl st top beg sc, fasten off. (8 sts)

RIBBON CANDY:

ROW 1: With White yarn and H hook ch-21, sc 2nd ch from hook, sc ea ch across, join red, fasten off white, ch-1, turn. (20 sts)

ROW 2: Sc ea st across, join white, fasten off red, ch-1, turn.

ROW 3: Sc ea st across, join red, fasten off white, ch-1, turn.

ROW 4: Rep row 3.

ROW 5: Sc ea st across, fasten off.

You can also vary the look of the ribbon candy piece by using red yarn for rows 1, 3 &5 and white yarn for rows 2 & 4.

PUTTING IT TOGETHER:

Make two of peppermint candy and 3 ribbon candy with white as row 1, 3 & 5 and 3 ribbon candy with red as row 1, 3 & 5. Fold the ribbon candy pieces into according folds and with thread and invisible thread tack to hold. Sew one circle to the tack together ribbon leaving about a 3” space between ea one. Then sew another circle to that one and a red ribbon, rep alternating ribbon colors ending with a circle.


PEPPERMINT AND RIBBON ORNAMENT:


Make a large and a small peppermint circle and one ribbon. According fold the ribbon as you did above and tack to hold. Sew large circle, ribbon, small circle tog with thread leaving 1\2” space between ea piece. Then make a loop to hang it with and sew it to the top.
Make two small peppermint circles and one ribbon. Rep as you did for the other ornament.

Pepermint Candy Ornament Free Crochet Pattern


PEPERMINT CANDY ORNAMENT FREE CROCHET PATTERN

MATERIALS:


Red Heart TLC Amore yarn in White and Red Velvet, size H hook or hook to obtain gauge, needle and invisible (clear) sewing thread.


Gauge: 4 sc = 1”, 4 rows sc = 1”


LARGE PEPERMINT CANDY (2” DIAMETER):


Carry unused yarns behind sts as you work.


With white yarn and H hook ch-4, sl st to form a ring.


RND 1: Ch-1, sc in ring, join red, drop white, sc in ring, (drop red, pick up white, sc in ring, drop white, pick up red, sc in ring) 3 times, sl st top beg sc, ch-1, turn. (8 sts)


RND 2: Sc next st, drop red, pick up white, sc sa st, (sc next st, drop white, pick up red, sc sa st, sc next st, drop red, pick up white, sc sa st) twice, sc next st, drop white, pick up red, sc sa st, drop red, pick up white, sl st top beg sc, ch-1, turn. (16 sts)


RND 3: Sc next 2 sts, (drop white, pick up red, sc next 2 sts, drop red, pick up white, sc next 2 sts) around ending, drop white, pick up red, sc last 2 sts, sl st top beg sc, fasten off.


MEDIUM PEPERMINT CANDY (1-1\2” DIAMETER):


Carry unused yarns behind sts as you work.


With white yarn and H hook ch-4, sl st to form a ring.


RND 1: Ch-1, sc in ring, join red, drop white, sc in ring, (drop red, pick up white, sc in ring, drop white, pick up red, sc in ring) 3 times, sl st top beg sc, ch-1, turn. (8 sts)


RND 2: Sc next st, drop red, pick up white, sc sa st, (sc next st, drop white, pick up red, sc sa st, sc next st, drop red, pick up white, sc sa st) twice, sc next st, drop white, pick up red, sc sa st, drop red, pick up white, sl st top beg sc, fasten off. (16 sts)


SMALL PEPERMINT CANDY (1” DIAMETER):


Carry unused yarns behind sts as you work.


With white yarn and H hook ch-4, sl st to form a ring.


RND 1: Ch-1, sc in ring, join red, drop white, sc in ring, (drop red, pick up white, sc in ring, drop white, pick up red, sc in ring) 3 times, sl st top beg sc, fasten off. (8 sts)


PUTTING IT TOGETHER:


Make one of each size of peppermint candy. With thread and invisible thread sew the three circles together leaving about a 1\2” space between ea one. Make a loop of thread for the hanger and attach it to the top of the ornament.

Candy Pom-Pom Ornaments Free Crochet Pattern

CANDY POM-POM ORNAMENT FREE CROCHET PATTERN


MATERIALS:

Lion Brand Fun Fur yarns in any colors, small amount of stuffing, size F hook, needle and invisible (clear) sewing thread.

GAUGE: large is 2” diameter, medium is 1-1\2” diameter and small is 1” diameter.

LARGE POM-POM:

With fun fur and F hook ch-4, sl st to form a ring.

RND 1: Ch-1, work 8 hdc in ring, sl st top beg hdc, ch-1, turn. (8 sts)

RND 2-3: (2 hdc next st, hdc next st) around, sl st top beg hdc, ch-1, turn. (12 sts)(18 sts)

RND 4: Hdc ea st around, sl st top beg hdc, ch-1, turn.

RND 5-6: (Hdc dec next 2 sts, hdc next st) around, sl st top beg hdc, ch-1, turn. (12 sts)(9 sts)

RND 7: Lightly stuff, hdc 1st st, (hdc dec next 2 sts) around, sl st top beg hdc, fasten off. (5 sts)

-make one.

MEDIUM POM-POM:

With fun fur and F hook ch-4, sl st to form a ring.

RND 1: Ch-1, work 8 sc in ring, sl st top beg sc, ch-1, turn. (8 sts)

RND 2: (2 hdc next st, hdc next st) around, sl st top beg hdc, ch-1, turn. (12 sts)

RND 3: Sc ea st around, sl st top beg sc, ch-1, turn.

RND 4: (Sk next st, sc next 2 sts) around, sl st top beg sc, ch-1, turn. (9 sts)

RND 5: Lightly stuff, sc 1st st, (sk next st, sc next st) around, sl st top beg sc, fasten off. (5 sts)

-make one

SMALL POM-POM:

With fun fur and F hook ch-4, sl st to form a ring.

RND 1: Ch-1, work 8 sc in ring, sl st top beg sc, ch-1, turn. (8 sts)

RND 2: Sc ea st around, sl st top beg sc, ch-1, turn.

RND 3: Lightly stuff, sc 1st st, (sk next st, sc next st) around, sl st top beg sc, fasten off. (5 sts)

-make one

PUTTING IT TOGETHER:

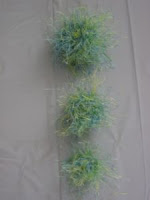
With needle and invisible sewing thread sew large pom-pom to medium pom-pom leaving 1” of thread in-between. Sew the medium pom-pom to the small pom-pom leaving 1” of thread in-between. Make a loop of thread for hanging the ornament and sew to the top of the large pom-pom. I found that they stay better if you knot the thread on each end of each pom-pom as you sew them.

Works well as a single ornament, or string together to make a garland!

www.donnascrochetdesigns.com
www.freepatternsdonnascrochetdesigns.com


December 09, 2008

Snowman Faces Ornaments Free Crochet Pattern

Snowman Faces Ornaments Free Crochet Pattern
This a super easy to make pattern. It is so versatile that I even made a gift bag with them.
There are so many possibilities. I'd love to hear from anyone that comes up with something different!


MATERIALS:


4 ply yarn in Soft White, TLC Amore yarn in Scarlet and Celery, H crochet hook or hook needed to obtain gauge, 1\2” white pom-poms, Two 6mm gold jingle bells, craft glue, black and orange fabric paint, and various chenille stems.


Gauge: 4 ply yarn: 4 hdc sts = 1”, 3 rows hdc = 1”; TLC yarn: 4 hdc = 1”, 3 rows hdc = 1”.


SNOWMAN HEAD (2” DIAMETER):


With White and H hook ch-4, sl st to form a ring.


RND 1: Ch-1, work 10 hdc in ring, sl st top beg hdc, ch-1, turn. (10 sts)


RND 2: (2 hdc next st, hdc next st) around, sl st top beg hdc, fasten off.


FLAT ROUND BACKING:


With TLC yarn and H hook ch-4, sl st to form a ring.


RND 1: Ch-1, work 10 hdc in ring, sl st top beg hdc, ch-1, turn. (10 sts)


RND 2: (2 hdc next st, hdc next st) around, sl st top beg hdc, ch-1, turn. (15 sts)


RND 3: (2 hdc next st, hdc next 2 sts) around, sl st top beg hdc, ch-1, turn. (20 sts)


RND 4: Rep rnd 2. (30 sts)


RND 5: Rep rnd 3. End rnd 3 fasten off. (40 sts)


RUFFLED EDGED BACKING:


Rep rnd 1-3 of flat round backing.


RND 4: Ch-3, (2 dc next st, 3 dc next st) around, sl st top beg ch-3, turn. (50 sts)


RND 5: (Ch-3, sl st next st, ch-4, sl st next st) around, fasten off.


To make contrasting edging fasten off rnd 4. Join new color and work rnd 5.


MAKING THE ORNAMENTS:


Round backed: Glue one made snowman face in the center of the flat round backing and the ruffled round backing. Add a loop for hanging.


Tree: Sew or glue 3 snowmen faces tog in a row. On top of that sew or glue two snowmen faces. On top of that sew or glue one snowman face. If you like sew or glue a miniature star ornament to the top snowman face. Sew or glue the stem to the bottom row of faces.


To make stem you neede brown 4 ply yarn and H hook.


Row 1: Ch-5, hdc 3rd ch from hook, hdc next 2 ch, ch-1, turn. (3 sts) Row 2-3: 2 hdc next st, hdc ea st across, ch-1, turn. End row 3 fasten off. (4 sts)(5 sts)


Bow Tie: Cut one chenille stem in half. Twist into a bow. Add small bells to ea end and glue to front of snowman face. Add a loop for hanging.


Squiggle Star: Cut 3 chenille stems in half. Fan fold leaving a straight tail at the top and bottom. Make five of these. Glue to the back of snowman face. Glue white pom-poms to ea end. Add a loop for hanging.


Star: Cut chenille stems into five 5” pieces. Fold the cut pieces in half. Arrange into a star and glue snowman face to front. Add a loop for hanging. You can also layer the finished star onto a plain crochet round for yet another look.


Curly-Q: Fold two of 2 different colored stems in half. Wrap around a pencil to coil. Arrange on a flat surface and glue snowman face to center. Add a loop for hanging. You can also layer the finished ornament onto a plain crochet round for yet another look.


Three in a Row: Twist tog two different colored chenille stems. Loop one end for the hanger. Glue three snowman faces down the length of the twisted stems.


I hope you have a wonderful Holiday!

http://www.donnascrochetdesigns.com/

http://www.freepatternsdonnascrochetdesigns.com/