Question of the week concerns the use of abbreviations in crochet. You can't get around them and they save wear and tear on the finger when keying in the instructions as well as the length of instructions.
The question is about one abbreviation in particular:
Sa = Same
I include a list of abbreviations I use at the end of all my patterns that I sale.
Recently I was asked what stitch it meant when I said: Ch-1, sc sa st as beg ch-1.
Written out: Chain 1, single crochet same stitch as begin chain-1.
I have also been told that the use of sa for same is confusing.
So what is the vote?
Should same be written out completely
or
is sa acceptable?
www.donnascrochetdesigns.com
www.freepatternsdonnascrochetdesigns.com
February 25, 2009
Crochet Tutorial on Chain Loop Stitch
 Crochet Tutorial on Chain Loop Stitch
I like to use the chain loop st to add texture to my crochet like in this Echoing Heart Tote.
It is a very easy stitch to master and works up quickly.
It's also great to the touch which is why I love to use it when I make bath rugs for my home!

The stitch is based on chaining and slip stitches in foundation row.


I have begun by making a base row of half double crochet.
In the first photo I have chained 12 or ch-12.
In the second photo I have slip stitched two stitches or sl st next 2.
You continue across the row: Ch-12, sl st next 2.

Here is the finished row

Here is the finished row

Here I have pushed or pressed the loops made in the previous row to the back of my work which will become the front of my piece and am now beginning to hdc in ea st across to lock the chain stitches in place and to have another row to work the Ch-12, sl st next 2.

Here is the back of the work with 1 base row hdc sts, 1 row ch lps and 1 row hdc.

Here is the front of the same piece.

This is how the next row of ch lp looks.

This is the back of a completed sample square of ch lp.

This is the front of the same piece.

In this sample is shows a much shorter ch lp st of ch-6 sl st next 2 sts.

On the top is the shorter ch lp st sample
On the bottom is the longer ch lp sample
By verying the number of chains in the loop you can get a very different texture.
Bunny in a Basket Free Crochet Pattern

BUNNY IN A BASKET FREE CROCHET PATTERN
MATERIALS:
1 skein Bernat brand Boa yarn in White, Blue Bird and Toucan, H hook or hook to obtain gauge, small amount of stuffing, small amount of cardboard, needle to take yarn, 2 chenille stems, craft glue, two 1\4” white pom-poms, one 5mm pink pom-pom, two 5mm brown pom-poms and one 1\2” white pom-pom.
FINISHED SIZE: Bunny: 9” tall including ears; Basket; 3-1\2” X 5”
Gauge: 4 sc = 1”, 4 rows sc = 1”
BUNNY:
With white yarn and H hook ch-4, sl st to form a ring.
RND 1: Ch-1, work 8 sc in ring, sl st top beg sc, ch-1, turn. (8 sts)
RND 2-3: (2 sc next st, sc next st) around, sl st top beg sc, ch-1, turn. (12 sts)(18 sts)
RND 4-8: Sc ea st around, sl st top beg sc, ch-1, turn.
RND 9: Sc next 2 sts, (sk next st, sc next 3 sts) around, sl st top beg sc, ch-1, turn. (14 sts)
RND 10-11: Sc ea st around, sl st top beg sc, ch-1, turn.
RND 12: Work 2 sc in ea st around, sl st top beg sc, ch-1, turn. (28 sts)
RND 13-19: Sc ea st around, sl st top beg sc, ch-1, turn.
RND 20: (Sk next st, sc next 3 sts) around, sl st top beg sc, ch-1, turn. (21 sts)
RND 21: (Sk next st, sc next 2 sts) around, sl st top beg sc, ch-1, turn. (14 sts)
Stuff bunny.
RND 22: (Sk next st, sc next st) around, sl st top beg sc, ch-1, turn. (7 sts)
RND 23: (Sk next st, sc next st) 3 times, sk last st, sl st top beg sc, fasten off. (3 sts)
ARMS (MAKE 2):
With white and H hook rep rnd 1-2 of bunny.
RND 3-9: Sc ea st around, sl st top beg sc, ch-1, turn. At the end of rnd 9 fasten off.
Fold rnd 9 flat and with needle and matching yarn sew to bunny at shoulders. Rep for other arm.
LEGS (MAKE 2):
With white and H hook rep rnd 1-2 of bunny.
RND 3-12: Sc ea st around, sl st top beg sc, ch-1, turn. At the end of rnd 12 fasten off.
Fold legs flat at rnd 12, with needle and matching yarn sew legs to bottom of bunny.
EARS (MAKE 2):
Cut two 4-1\2” long piece of chenille stems. Twist stems into the shape of a circle and secure ends.
With one circle join white yarn with H hook around stem. Sc evenly around stem making certain stem does not show through, fasten off.
Rep for other circle.
Shape the circles into bunny ears and with needle and matching yarn sew to the back of the bunny’s head.
Glue two 1\4” white pom-poms to face for muzzle. Glue the 5mm pink pom-pom above this and the two 5mm brown pom-poms to the face for eyes. Glue the 1\2” white pom-pom to the backside of the bunny for a tail. Cut a length of either color of the boa yarns and tie around the bunny’s neck in a bow.

BASKET:
With Toucan and H hook ch-4, sl st to form a ring.
RND 1: Ch-1, work 8 sc in ring, sl st top beg sc, ch-1, turn. (8 sts)
RND 2-4: (2 sc next st, sc next st) around, sl st top beg sc, ch-1, turn. (12 sts)(18 sts)(27 sts)
RND 5: Sc next 2 sts, (2 sc next st, sc next 4 sts) around, sl st top beg sc, ch-1, turn. (32 sts)
RND 6: (2 sc next st, sc next 3 sts) around, sl st top beg sc, ch-1, turn. (40 sts)
RND 7: (2 sc next st, sc next 4 sts) around, join Blue Bird, sl st top beg sc, ch-1, turn, fasten off Toucan. (48 sts)
RND 8-19: Sc ea st around, sl st top beg sc, ch-1, turn. At the end of rnd 19 join toucan and fasten off blue bird.
RND 20-21: Sc ea st around, sl st top beg sc, ch-1, turn. At the end of rnd 21 fasten off.
BASKET BOTTOM:
With toucan and H hook rep rnd 1-7 of basket, at the end of rnd 7 fasten off. Cut a piece of thick cardboard a little smaller than piece just made. With needle and matching yarn, turn basket inside out and sew bottom to the bottom of the basket inserting the cardboard as you sew.
HANDLE:
Twist both ends of one chenille stem into small loops. With Blue Bird and H hook join around stem, ch-1, evenly sc around stem to other side, fasten off. With needle and matching yarn, sew handle inside the basket.
This is a super easy and fast project to make!
Not just for Easter either!
www.donnascrochetdesigns.com
www.freepatternsdonnascrochetdesigns.com
February 14, 2009
Crochet Clothing and Seams
Here is a tip I've discovered while making crochet clothing.
I know there is debate on how to sew your seams and it the seams go to the inside of the garment like when you machine sew or to the outside.
I'm not here to take up the debate, personally whatever works for you is the right way to do it.
I personally like to hand sew with maching yarn in what my mother always called a whip stitch.
You simply place to two edges together and sew through them, taking small stitches.
As in the above photo

The problem I come across when I do this, it that the seams have a tendency to stand out, or be raised up off the garments surface.
When working with a heavier yarn it doesn't seem to show as much as it does with a light yarn like this Lacette.

My solution is to wet press the seams. I place my iron on the cotton setting, let it warm up. I then lay a damp cloth over the seam and place the hot iron on it. A count to thirty and the iron is lifted. This makes the seam lay flat, more like it is part of the crochet garment and not an obvious indicator where it was sewn together.
I don't know if you can see the results on the above photo clearly, but the center seam and bottom seam of the insert have been pressed in this manner while the top seam of the insert hasn't.

Here the skirt has been completely pressed.
http://www.donnascrochetdesigns.com/
http://www.freepatternsdonnascrochetdesigns.com/
I know there is debate on how to sew your seams and it the seams go to the inside of the garment like when you machine sew or to the outside.
I'm not here to take up the debate, personally whatever works for you is the right way to do it.
I personally like to hand sew with maching yarn in what my mother always called a whip stitch.
You simply place to two edges together and sew through them, taking small stitches.

As in the above photo

The problem I come across when I do this, it that the seams have a tendency to stand out, or be raised up off the garments surface.
When working with a heavier yarn it doesn't seem to show as much as it does with a light yarn like this Lacette.

My solution is to wet press the seams. I place my iron on the cotton setting, let it warm up. I then lay a damp cloth over the seam and place the hot iron on it. A count to thirty and the iron is lifted. This makes the seam lay flat, more like it is part of the crochet garment and not an obvious indicator where it was sewn together.
I don't know if you can see the results on the above photo clearly, but the center seam and bottom seam of the insert have been pressed in this manner while the top seam of the insert hasn't.

Here the skirt has been completely pressed.
http://www.donnascrochetdesigns.com/
http://www.freepatternsdonnascrochetdesigns.com/
Putting a Zipper into a Crochet Skirt
Putting a Zipper into a Crochet Skirt
Putting a zipper into a skirt is a little different than putting a zipper into a jacket in that the jacket zipper comes in two section and the skirt zipper is all in one.

Begin by laying out your skirt on a flat surface. Place the zipper (in this case a 12" dress zipper from my local fabric and craft store) along side the skirt's edge. Line up to the top of the zipper with the top of the skirt. Place a pin where the zipper ends.
This shows you how long the last seam in your skirt will be.
So place the two sides together, with needle and yarn, sew from this point (where you placed the pin) down to the skirt's bottom edge.

With the seam sewn, lay the skirt back onto the flat surface. Pin the zipper to each side of the skirt's opening.

Make sure when you pin the zipper that the edge of the skirt and the zipper's teeth are not close enough to touch--this will cause the zipper to get caught in the yarn of the skirt when opening and closing it.

You can either sew the zipper in by hand or machine.

Finished zipper.
February 11, 2009
Front Post Double Crochet and Back Post Double Crochet Stitch Tutorial
Front Post Double Crochet and Back Post Double Crochet Stitch Tutorial

Front Post Double crochet or Fpdc is begun by working a base of double crochet (dc)

You then began the next dc st by yarn over (yo)

Front Post Double crochet or Fpdc is begun by working a base of double crochet (dc)

You then began the next dc st by yarn over (yo)

Then instead of inserting your hook through the top of the stitch (st) you go between - front to back- your previous rows st and the st you are working.


Then bring the hook back out the front

Yo


Yo

Pull through two lps

Yo and pull through last two lps on the hook completing the st.

Finished stitch


Front of the work

Back of the work. 

Yo and instead of inserting the hook front to back like you did when making a Fpdc you insert the hook from the back of the work to the front

Then insert the hook over the dc and back to the back of the work.

Yo

Three lps on hook

Yo, pull through 2 lps on hook

Yo, pull through last 2 lps on hook to complete the stitch.

Here the st is complete

Completed row of 4 dc, 3 Bpdc and 4 dc

Yo

You now have 3 loops (lps) on your hook

Yo

Pull through two lps

Yo and pull through last two lps on the hook completing the st.

Finished stitch

Two rows of 4 regular dc, 3 Fpdc, then 4 regular dc.

Front of the work

Back of the work.
Back Post Double Crochet or Bpdc

Again you begin on a base of dc (double crochet)

Yo and instead of inserting the hook front to back like you did when making a Fpdc you insert the hook from the back of the work to the front

Then insert the hook over the dc and back to the back of the work.

Yo

Three lps on hook

Yo, pull through 2 lps on hook

Yo, pull through last 2 lps on hook to complete the stitch.

Here the st is complete

Completed row of 4 dc, 3 Bpdc and 4 dc
Why show both the Fpdc and Bpdc when basically they are the same st except with one you insert the hook front to back and the later back to front?
This is why:


This is my pattern for Lavender Heart Purse.


Row 7: Sc next 2 sts, pick up Red, drop Aran, Bpdc next 2 sts, pick up Aran, drop Red, sc next 3 sts, drop Aran, pick up Red, Bpdc next 2 sts, pick up Aran, fasten off Red, sc last 2 sts, ch-1, turn. 
Row 2: you have made your sc and are joining the Red


Baby Hearts Afghan
All three were working using a combination of Fpdc and Bpdc. It gives the hearts a 3-D quality and by combining it with sc (single crochet) as the background, it really enhances the 3-D effect.
All three were working using a combination of Fpdc and Bpdc. It gives the hearts a 3-D quality and by combining it with sc (single crochet) as the background, it really enhances the 3-D effect.
Here is a sample pattern:
Row 1: With Aran and H hook ch- 12, sc 2nd ch from hook, ch-1, turn. (11 sts)
Row 2: Sc next 5 sts, join Red, drop Aran, Fpdc next st, drop Red, pick up Aran, sc last 5 sts, ch-1, turn.
Row 3: Sc next 4 sts, pick up Red, drop Aran, Bpdc next 3 sts, drop Red, pick up Aran, sc last 4 sts, ch-1, turn.
Row 4: Sc next 3 sts, pick up Red, drop Aran, fpdc next 5 sts, drop Red, pick up Aran, sc last 3 stsm, ch-1, turn.
Row 5: Sc next2 sts, pick up Red, drop Aran, Bpdc next 7 sts, drop Red, pikc up Aran, sc last 2 sts, ch-1, turn.
Row 6: Sc next 2 sts, pick up Red, drop Aran, Fpdc next 3 sts, drop Red, pick up Aran, sc next st, drop Aran, pick up Red, Fpdc next 3 sts, drop Red, pick up Aran, sc last 2 sts, ch-1, turn.
Row 7: Sc next 2 sts, pick up Red, drop Aran, Bpdc next 2 sts, pick up Aran, drop Red, sc next 3 sts, drop Aran, pick up Red, Bpdc next 2 sts, pick up Aran, fasten off Red, sc last 2 sts, ch-1, turn.
Row 8: Sc ea st across, fasten off.
Here it is in picture form:
Here it is in picture form:

Row 2: you have made your sc and are joining the Red


Making the Fpdc

Fpdc is finished


Row 3: Making the Bpdc


Bpdc are complete and I am now dropping the red yarn to the back of my work and picking up the Aran yarn which is also to the back of my work.

Front view of row 3 completed.

We have jumped to row 5 and show the 7 Bpdc made


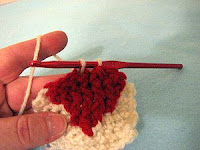

The 2 lps of the sc are on my hook and now I am switching from Aran to Red

The finished heart.

This is the back of the finished heart. When making Fpdc and Bpdc you are not able to carry yarn behind sts as you work them and need to drop and pick up colors as explained.

Front view of row 3 completed.

We have jumped to row 5 and show the 7 Bpdc made


This is row 6. I have made the 3 Fpdc and am now dropping the Red yarn and picking up the Aran yarn.


The 2 lps of the sc are on my hook and now I am switching from Aran to Red

The finished heart.

This is the back of the finished heart. When making Fpdc and Bpdc you are not able to carry yarn behind sts as you work them and need to drop and pick up colors as explained.
Subscribe to:
Posts (Atom)